Fatal inconsistent data read from 0x80 0 127 что делать
I was using YUMI to install multiple ISOs on a multiboot USB drive. All of its top-level menu picks worked correctly except one. That one, “Directly Bootable ISOs or Windows XP,” gave me a rapidly scrolling list of “Fatal! Inconsistent data read from” errors. After each iteration of “inconsistent data read from,” it would name some kind of numerical address (e.g., 0x80 3272020888+127). After a number of these iterations, it would put me at a GRUB prompt. This post describes my efforts to fix that problem.
I began with a search that led to solutions that looked likely to be complex and very time-consuming. I wondered if the problem was due to YUMI 0.0.8.1. I searched for a copy of 0.0.7.9, which I had used with more success previously. My search was unsuccessful. I restored a copy from backup and tried starting over with that. I had to reformat the YUMI multiboot drive with Windows in order to wipe out and redo from scratch; the YUMI formatter did not overwrite the drive.
Unfortunately, switching to 0.0.7.9 did not fix the “Fatal!” error. I tried the YUMI drive in another machine, as I should have done before. It did not seem to scroll the same “Fatal!” errors, but it may have done so very rapidly; all I saw was a flash and then the GRUB prompt. I concluded it was indeed a problem with the YUMI drive. Yet that was puzzling. I had used this same 16GB USB drive for a YUMI installation previously, and it had worked on these same machines, using this same version of YUMI. These computers would still boot into Windows with no problem.
Since the problem arose from one particular menu pick within the multiboot drive, I decided to try to understand YUMI’s menu setup. A look at the multiboot drive in Windows Explorer showed me the following contents at the root level (i.e., H:\). All of these items were the names of folders; there were no filenames in the root directory.
# Menu Entry Created by Lance http://www.pendrivelinux.com for YUMI – (Your USB Multiboot Installer) default vesamenu.c32 prompt 0 timeout 300 menu title Your Universal MultiBoot Installer menu background yumi.png MENU TABMSG http://www.pendrivelinux.com MENU WIDTH 72 MENU MARGIN 10 MENU VSHIFT 3 MENU HSHIFT 6 MENU ROWS 15 MENU TABMSGROW 20 MENU TIMEOUTROW 22 menu color title 1;36;44 #66A0FF #00000000 none menu color hotsel 30;47 #C00000 #DDDDDDDD menu color sel 30;47 #000000 #FFFFFFFF menu color border 30;44 #D00000 #00000000 std menu color scrollbar 30;44 #DDDDDDDD #00000000 none
label Boot from first Hard Drive
menu label Continue to Boot from ^First HD (default)
KERNEL chain.c32
APPEND hd1
MENU DEFAULT
Advice from RMPrepUSB led me to understand that I was winding up at a Grub4DOS prompt. I hit Esc and found myself at a basic GRUB4DOS window with options for “find /menu.lst” etc., commandline, reboot, or halt. I tried commandline. RMPrepUSB suggested that I might type in the commands and see what would happen. I tried with “KERNEL /multiboot/grub.exe,” though I suspected that would achieve nothing because, as I say, I was already looking at the “grub>” prompt. It said, “Warning! No such command : KERNEL.” I now realized that I could already have told that it would say something like that, because onscreen advice said that hitting the Tab key would give me a list of commands, and — talk about persnickety — kernel was listed there, but lowercase. So, alright, I tried again: “kernel /multiboot/grub.exe.” This time, it gave me “Error 25: Disk read error.” That seemed pretty close to the “Inconsistent data read” error message that had commenced this expedition. But why was it happening?
Had grub.exe or menu.lst somehow become corrupted? I had tried two separate installations, using YUMI 0.0.7.9 and 0.0.8.1, and had wound up with the same “Fatal” error in both cases. In between, I had reformatted the USB drive. And 0.0.7.9 had created successfully working YUMI installations on this same USB drive previously. That didn’t seem like the answer.
I took a look at H:\multiboot\menu\menu.lst. (H was the YUMI drive.) I didn’t know much about how it was supposed to look, but in Notepad it did not look obviously corrupted. It seemed, tentatively, that my problem was with grub.exe, not with menu.lst. I wondered if I could download a replacement for grub.exe. I renamed H:\multiboot\grub.exe to be grub.old, figuring that this would keep it around (in case I needed it) but would render it non-executable. A search led to a recent webpage where I was able to download a copy of grub.exe. Putting that into H:\multiboot changed the situation, but did not solve the problem. That is, I still wound up at a grub> prompt, but without the “Fatal! Inconsistent Data Read” errors. The fact that something had changed suggested that the commands were finding grub.exe, at least.
It seemed that, somehow, two different versions of Grub were operating. As just noted, I had to use “kernel” as a lowercase command, but YUMI was successfully using it (above) as KERNEL. Likewise, the commands shown above use “config-file,” with a hyphen, but pressing Tab at the Grub prompt told me that the proper command was “configfile.”
I tried typing “ls” (that’s lowercase LS) at the grub prompt. It said, “Error 25: Disk read error.” So both the simple file listing command (ls) and the foregoing reference to grub.exe failed because of a disk read problem. Why was Grub unable to read my USB drive?
I tried creating another YUMI drive, using a different USB drive; and on that other YUMI drive I began by just adding one of the items that would appear in the “Directly Bootable ISOs” section. It was the Windows 7 32-bit System Recovery CD. The menu worked properly in this case. So now it appeared the problem might be related to the USB drive — even though that USB drive had functioned correctly in the past.
I repeated the same steps with the problematic drive as with the one that had just worked correctly: reformat it in Windows Explorer, start YUMI, add the Win7 Recovery CD as an Unlisted ISO. When attempting to reformat, I got an error. It said, “Windows was unable to complete the format.” It was showing “Unknown capacity” in the format window. There was something wrong with this drive. A search led to the advice to use Start > Run > diskmgmt.msc > right-click on the USB drive. It was showing as Unallocated, so I selected New Simple Volume. But nothing happened. I plugged it into another computer. It offered to format the USB drive. I accepted the offer. But it was still showing unknown capacity, and Windows was unable to complete the format there too. I tried the HP Drive Key Boot Utility. This was apparently different from the HP USB Disk Storage Format Tool. I wasn’t sure if a USB drive had to be manufactured by HP to use these tools, but this one was. The boot utility said it was not supported for installation on my Windows 7 system. But the format tool worked. When it was done, I successfully reformatted in the usual way, in Windows Explorer, and then installed the Win7 32-bit System Recovery CD on this newly rescued HP USB drive. I tried booting the other computer with that, and it worked.
Update: I spoke too soon. It worked at first, and then stopped working. It stopped working in a weird way. When I would boot with the HP USB drive, it would give me a black screen with just this part of a word showing: “figuration.” It did it consistently, over a half-dozen reboots, so it didn’t seem that the drive was just decaying or something. I wondered whether (a) I had screwed up a menu so that this was all that would show or (b) this had something to do with whatever Steve Si was saying in the December 18 (3:30 AM) comment (below) that he had just posted in response to the foregoing paragraphs.
It didn’t seem like it was a case of a menu screwup on my part. I hadn’t edited syslinux.cfg, which I believed was the first menu that would appear, and anyway the “figuration” string did not appear in that file. It wasn’t getting to menu.lst, not that I had edited that either.
I decided to try to figure out Steve’s comment. RMPrepUSB Tutorial No. 7 said that I could test a USB drive quickly (using the Quick Size Test option in RMPrepUSB) or thoroughly (using H2TESTW). I didn’t want to spend the hours that the latter would take (but did download a copy anyway). I had made a backup of the files on the HP USB drive, so I tried RMPrepUSB, which was going to wipe the disk during its test. Using RMPrepUSB involved obtaining RMPrepUSB. I downloaded RMPrepUSB_Portable_2.1.648wee.zip. (I wasn’t sure why there was a “wee” in the filename.) I extracted the files from the ZIP and ran RMPREPUSB.exe. I selected the HP USB drive and clicked Quick Size Test. For some reason, it minimized several other windows I had open on the screen, including the browser window in which I was typing these notes. But it didn’t close them, so I resumed. The test ran. It indicated that it was going to take about 27 minutes — much more than the 6-10 minutes estimated on the RMPrepUSB website for a drive of this size. I suspected the time required might depend on the condition of the drive — that, in other words, RMPrepUSB might be finding problems on the USB drive. But no, at the end of 27 minutes, it reported that my drive passed the quick test. So, pending a more thorough test, USB drive corruption did not appear to be the reason for my problems.
Steve suggested trying the QEMU Emulator button in RMPrepUSB. I tried to restore the bootable image to the USB drive, using Acronis True Image Home 2011. This would be about the time when I discovered that Acronis did not see USB drives as targets for image restores, at least not without the Universal hardware-independent option which I know I had bought and thought I had installed. So, oops, I guess I may have used the wrong form of backup. A search led to an idea for another search which led to going into Acronis (in Windows 7) and choosing Tools and Utilities > Mount Image > select the image etc. Now I had the Acronis TIB image loaded as a virtual drive and could use Windows Explorer to copy its contents to another folder. In the spirit of experimentation, I copied those files to the newly reformatted HP USB drive. I realized this would not be bootable. I was hoping to achieve a “Boot error” message, because that’s what I had managed to achieve on the other, 32GB Patriot USB drive by this point. Symmetry. That’s what it’s all about: symmetry. Anticipating some such development, while the files were copying — and, anyway, to try to rescue that Patriot drive — I did a search and formed the belief that the problem could be in the BIOS settings on the computer I was trying to boot. But the computer in question at this moment was an ASUS Eee PC with virtually no options to adjust. I had already tried setting the boot flag on the Patriot in GParted, with no luck.
The situation at this point was overwhelming, not to say fubar. With a whiff of desperation in the air, I resorted to the possibility of biting the bullet and doing this the hard, painful RMPrepUSB way. The logic, here, was that I had used the HP tool on an HP drive and yet said drive was still recalcitrant, whereas good Steve quoth that this was not surprising. He seemed to have the answer. I examined that possibility in another post.
Later (after the comment shown below), I came back here. RMPrepUSB had not turned out to be my preferred tool after all. I knew that YUMI had worked for me. It seemed my problem had to be with the USB drive, or somewhere else in the process. One thing I noticed was that YUMI did not always actually format a USB drive when I checked the Format option. It would just flash an error message and proceed on to load the requested ISO onto the USB drive. So I had to do a separate formatting process to be sure. I also noticed that Windows Explorer > right-click > Format sometimes had problems formatting. I found it handy to use MiniTool Partition Wizard to be sure. There also seemed to be a situation where the computer would get confused, and it would be better to take such steps after rebooting, or on another machine. I wasn’t sure about all this; these were just impressions or possibilities.
I was not entirely sure what caused the problem to be sorted out, in the end. My sense was that proper formatting of the USB drive was a factor. At some point, the problem disappeared, apparently due to continued tinkering along the lines described above.
Fatal inconsistent data read from 0x80 0 127 что делать

USB-FDD: Флешка считается дискетой, все операции ввода-вывода делаются так же, как и с дискетой. Подразумевается, что там есть только одна файловая система (нет MBR и таблицы разделов)
USB-HDD: Флешка становится жёстким диском. Подразумевается, что на ней есть MBR.
USB-ZIP: Первый и единственный раздел флешки доступен, как дискета. Подразумевается, что на флешке есть MBR с единственным разделом, занимающим флешку полностью.

В целом сбои более вероятны, чем если бы он соответствовал. Вплоть до того, что система перестанет считать флешку вменяемым устройством хранения данных и перестанет монтировать файловую систему на ней.
Как именно?
> на домашнем опять же никак( ошибки разные
Какие именно?
1. Hiren:
(fd0,0)
FAT12 BPB found with 0xEB (jmp) leading the boot sector
probed C/H/S=80/2/18, probed total sectors=2880
2. Alkid:
Will boot NTLDR from drive=0x0, partition=0x0 (hidden sectors=0x4fe0)
setup is inspecting your system configuration <насчёт этой строчки неуверен>
ntdetect failed
3. windows PE mini USB Edition:
Will boot NTLDR from drive=0x0, partition=0x0 (hidden sectors=0x4fe0)
потом кракозябры быстро очень и ребут
4. boot from HDD-1:
Warning! No such command: rootnoverify(hd0,0)
timeout=10
default 0
gfxmenu (hd0,0)/Boot/gfx/sdelaisam.gz
title Boot from HDD-1 (Загрузить с жёсткого диска)
chainloader (hd0,0)+1
rootnoverify(hd0,0)
title Load PLoP USB Driver
root (hd0,0)
kernel /plop/plpbt.bin
title Start Windows XP (Start ХР from the 1st partition)
root (hd0,0)
rootnoverify (hd0)
root (hd0,0)
chainloader (hd0,0)/ntldr
title Start Vista/Seven (Start Vista or 7 from the 1st partition)
root (hd0,0)
chainloader (hd0,0)/bootmgr
title Start Vista/Seven (Vista/7 Notebooks (asus), with the 1st backup partition)
root (hd1,0)
chainloader (hd1,1)/bootmgr
title Reboot (Перезагрузка)
reboot
title ShutDown PC (Выключить)
halt
Fatal inconsistent data read from 0x80 0 127 что делать
Hello Ubuntu Community,
I’m quite new to Linux (some very limited experience with openSUSE several years ago) but since I’m really tired of Windows, I feel the time to switch over to Linux has come.
I have installed 12.10 yesterday, and have some issues for which I’d like to ask advice.
Okay, first of all a short description of my box, and of what I’ve done so far:
BIOS: Intel MQ96510J.86A.1754.2008.1117.0002
Mainboard: Intel DQ963FX with Graphics Chipset Q965/Q963
CPU: Intel Pentium Dual CPU E2180 @ 2.00GHz
PCI Graphics Card: ZOTAC GeForce GT430
Sound: onboard (Windows uses NVIDIA High Definition Audio from graphics card install)
Wired Networking Adapter: Intel 82566DC Gigabit Network Connection
Wireless Networking: none
Optical Drive: LG DVD burner, model GH24NS90 (ATA Device)
HDD1 (sda): Samsung HD502HJ
HDD2 (sdb): Samsung HD320KJ
Windows 7 is installed on sda1-3.
This repeats 4 times, so that, all in all, I have 10 lines of the above.
(hd1,0)
[Multiboot-kludge, loadaddr=0x100000, text-and-data=0x6739, bss=0x0, entry=0x100968]
Then GRUB starts, with several options.
If I choose ‘Memory test (memtest86+)’ or ‘Memory test (memtest86+, serial console 115200)’ I get the following:
error: too small lower memory (0x99100 > 0x8f000).
Choosing ‘Ubuntu’ or ‘Ubuntu with advanced Options’ boots the system, i.e. I get to the log-on screen and can use Ubuntu.
I recall that, during partitioning, fourth console (L-Alt+F4) once or twice issued a warning, but said something along the lines of ‘proceeding with formatting as requested’.
I suspect Ubuntu doesn’t really appreciate use of the LVM on desktop systems.
In addition, I had some problems with my graphics card (GPU lock after a few seconds of desktop operation) which I could solve by setting GRUB to ‘nomodeset’ and apt-getting the proper NVIDIA drivers.
I have no sound on Skype, but ‘Audacious’ Music Player works (minor issue which I’ll figure out); I just mentioned it to make a complete report..
I’d be most grateful for help regarding the ‘fatal error’ and ‘memory error’ issues, which must be eliminated.
Fatal! Inconsistent Data!
OS: Windows XP SP3
Primary HDD: WD 320GB IDE partitioned into two separate partitions, one containing my OS.
Early today I left my computer for a little while. Upon returning I was greeted with the following BSOD:

So I tried some of the usual things. The following things were attempted but to no avail:
-Restarting
-Any sort of safe mode (Safe mode would begin to load but hang at giveio.sys)
-Last known good configuration
Eventually I grabbed my Hiren boot cd v14.1, upon booting it up I chose the option to boot from the Hard Drive.
It immediately gave me the following:
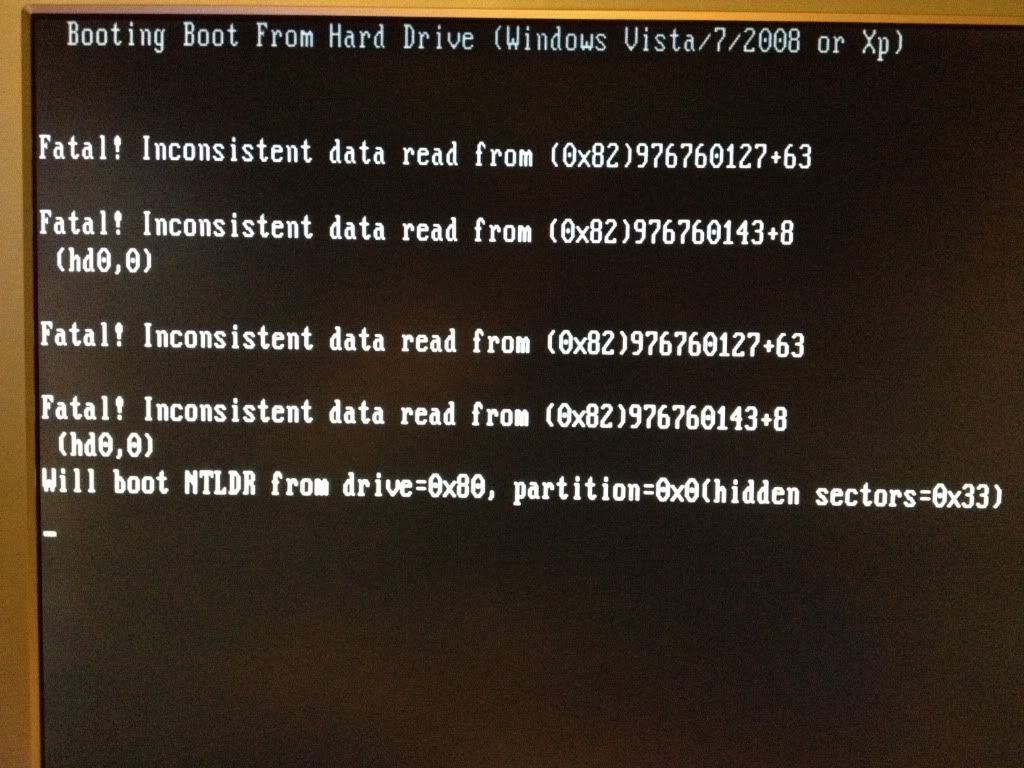
It then however continued to the windows Boot screen and went on to work as it normally would. ( I am currently posting this information
from the computer in question )Using this method, I am able to boot every time.
Then using Hiren’s I did the following:
-Ran chkdsk on both of my partitions.
-Ran memtest86.
Neither of those things has fixed the issue. I’m not sure what to do next, so I figured I’d ask. Any help is appreciated.
BC AdBot (Login to Remove)
System manufacturer and model?
You ran the chkdsk /r command? Start/Run. type chkdsk /r and hit Enter. Reboot. the command will execute before booting into Windows.
I’ve never used Hiren’s so I can only guess that those error messages indicate a problem with your partition or hard drive.
You ran the chkdsk /r command? Start/Run. type chkdsk /r and hit Enter. Reboot. the command will execute before booting into Windows.
I’ve never used Hiren’s so I can only guess that those error messages indicate a problem with your partition or hard drive.
It’s a custom build, if you’d like me to list every part I’d be more than willing to.
I’ll try the repair command and post the results.
Double-click BlueScreenView.exe file.
When autoscan is done (screen comes up), click Edit/Select All. then File/Save Selected Items.
That’s a tricky error. Usually it is the result of an error with a piece of hardware telling its driver to use a piece of memory that it is not allowed to use. If that’s the case for you, it appears to be an integral piece of hardware that even loads in the DOS like boot of your boot CD.
Here are some things that you can try.
First see if you were lucky enough to have a minidump file created in c:\windows\minidump
If so attach it to a post here.
Are you using the secondary IDE port for anything?
Is there anything else plugged into the Primary IDE cable like a CD drive?
Disconnect the CD drive and try booting.
If you have any cards plugged into the motherboard, pull them out one by one trying to boot the computer each time. Especially, network cards, modems, sound cards and USB cards.
If you have a video card and video on the motherboard try removing the video card and plug the monitor into the motherboard and boot.
See what happens if you try booting without the keyboard plugged in.
Have you upgraded any drivers shortly before this happened? Have you added any new hardware recently?
Double-click BlueScreenView.exe file.
When autoscan is done (screen comes up), click Edit/Select All. then File/Save Selected Items.
I downloaded BlueScreenView, however after running it and checking manually it seems I have no minidump files to be viewed. =(
That’s a tricky error. Usually it is the result of an error with a piece of hardware telling its driver to use a piece of memory that it is not allowed to use. If that’s the case for you, it appears to be an integral piece of hardware that even loads in the DOS like boot of your boot CD.
Here are some things that you can try.
First see if you were lucky enough to have a minidump file created in c:\windows\minidump
If so attach it to a post here.
Are you using the secondary IDE port for anything?
Is there anything else plugged into the Primary IDE cable like a CD drive?
Disconnect the CD drive and try booting.
If you have any cards plugged into the motherboard, pull them out one by one trying to boot the computer each time. Especially, network cards, modems, sound cards and USB cards.
If you have a video card and video on the motherboard try removing the video card and plug the monitor into the motherboard and boot.
See what happens if you try booting without the keyboard plugged in.
Have you upgraded any drivers shortly before this happened? Have you added any new hardware recently?
As stated above I have no minidump files.
The primary connection on the primary IDE cable is connected to one 320GB HDD and the secondary connection is connected to a 500GB HDD. The secondary IDE port is connected to a floppy drive. I unplugged the slave first, had no affect, and then the floppy drive, which also had no affect.
Unplugging the CD/DVD drive had no affect, the CD/DVD drive is sata.
Aside from my video card, I have a sound card and a capture card, unplugging one or both had no affect.
My motherboard does not have onboard video.
The keyboard is USB and I attempted to boot without any USB’s plugged in at all. No affect.
I hadn’t updated any drivers recently, it’s been at least a month. No new hardware has been installed either.
This is quite the annoyance =( I do however thank you both for the help.
When you get it in to Windows using your boot CD and getting past the errors, have you looked in the Device Manager for anything with a question mark or exclamation mark on it?
I can only guess that those error messages indicate a problem with your partition or hard drive.
That seems a reasonable interpretation.
When you get it in to Windows using your boot CD and getting past the errors, have you looked in the Device Manager for anything with a question mark or exclamation mark on it?
The device manager doesn’t have any question marks or exclamations, I do have a 1394 adapter disabled, but I did that purposefully.
I also tested the RAM sticks one at a time, which had no affect.
And well it’s a good song, so I don’t blame you (=
I can only guess that those error messages indicate a problem with your partition or hard drive.
That seems a reasonable interpretation.
I’ll go ahead and burn that disc and report back with the results, thank you for the help.
So after downloading the file and extracting I burned it using imgburn, which I incidentally already had. After burning it to two separate discs, when using either of them I get the following error:
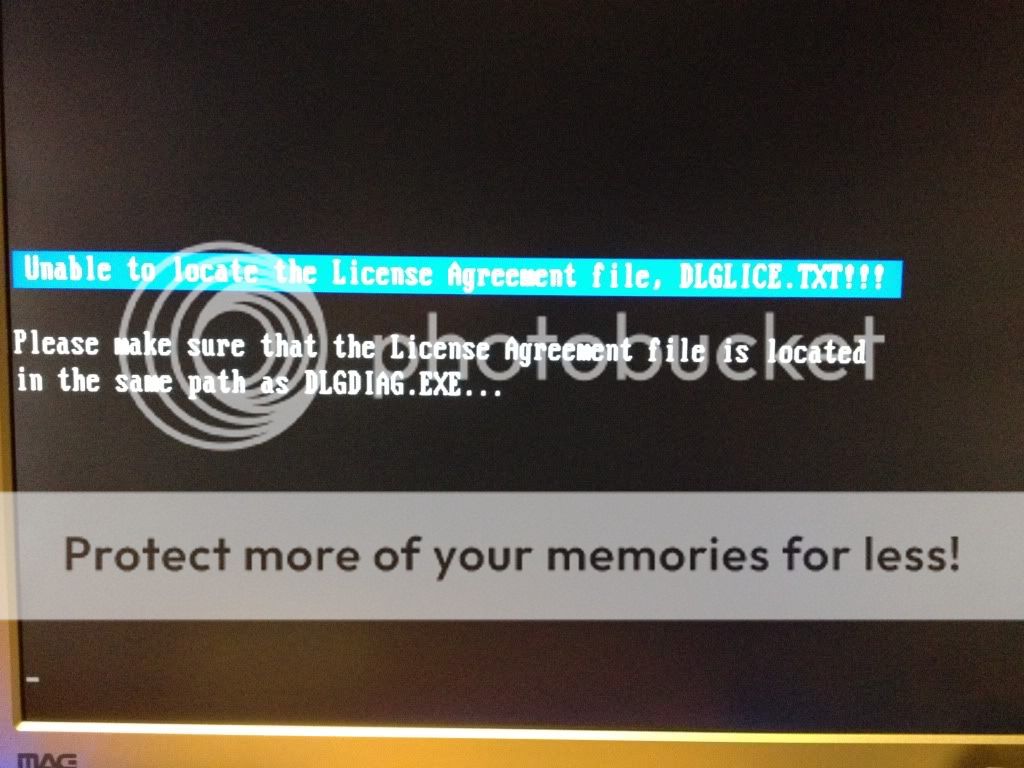
After checking both discs, the files are in the same directory, so I don’t know what the problem is.
Common problem: I can’t at the moment recall the solution, so I suggest for now that you use SeaTools for DOS which will work satisfactorily on most brands of HDD.
or use the following direct download link to download the latest version of SeaTools for DOS:
Download SeaTools for DOS ISO Image