64 bit Java on Windows 7 not seen #89
Comments
jim618 commented Mar 22, 2013
The text was updated successfully, but these errors were encountered:
jim618 commented Mar 22, 2013
The multibit.exe that is installed in your MultiBit installation directory searches for a Java runtime to use and is not picking up your 64 bit JVM. This is a bug. As a workaround you could try downloading the multibit-exe.jar executable jar for your release (https://multibit.org/releases) and putting it in your installation directory. Then try starting it directly using:
You can also substitute a path to your javaw.exe instead of the «java’ above.
gary-rowe commented Mar 22, 2013
For ShortcutPanel, you will also have to deliver 64bit dlls:
jim618 commented Mar 24, 2013
Another similar report:
I installed the latest 64 bit JVM 7u15 from Oracle on my Windows 7 Ultimate desktop.
The multibit installer complains “Java is not found on your computer”. When I install a 32 bit JVM the installer works. The website states, that multibit works on both architectures.
Am I doing something wrong?
I’ll also put in your workaround of using a 32 bit Java so people can
get it working.
Thanks for the heads up.
moneytoo commented Apr 7, 2013
gary-rowe commented Apr 7, 2013
I don’t have access to 64-bit Windows here, but I can put together a trial installer if anyone would be willing to test it out. Jim, can you let me know the most appropriate branch to base my trial on?
jim618 commented Apr 7, 2013
bitcoinj clone branch: bcj-master-mb-alice
multibit branch: mb-0.5-bcj-0.8-alice
jim618 commented Apr 9, 2013
moneytoo commented Apr 9, 2013
I tested both multibit-0.4.23-windows.exe and multibit-0.5.9-SNAPSHOT-windows.exe on my machine at work. I uninstalled both 32-bit and 64-bit versions of JDK, restarted and installed 64-bit version only. Previously both versions of multibit found Java but neither version worked with 64-bit JDK/JRE only.
I also removed java from PATH so this is what Java installer does (I didn’t know that, it seems quite new):
jim618 commented Apr 15, 2013
Unfortunately the utility I use to produce the exe file from the executable jar (jsmooth) does not support 64 bit JDK/ JREs. See:
http://stackoverflow.com/questions/1967549/java-packaging-tools-alternatives-for-jsmooth-launch4j-onejar
The only viable suggestion in there is to use JFX and Java 7.
da2ce7 commented Jun 9, 2013
da2ce7 commented Jun 10, 2013
I think that this code would work fine for MultiBit:
mikehearn commented Jul 30, 2013
FYI although the bundling tool is technically a part of JavaFX, I believe it does not require the usage of the JFX widget toolkit in the app. It should work for Swing apps too.
jim618 commented Aug 24, 2013
makruz commented Nov 7, 2013
Version 0.5.14 does not find Jave on my Windows 7 64-bit. So I assume it is NOT fixed yet?
deglavs commented Nov 28, 2013
Version 0.5.15 also does not find Java on my Windows 8.1 64-bit. Fix it please! 🙂
The path is C:\Program Files\Java\jdk1.7.0_45\bin
gary-rowe commented Nov 29, 2013
Another thread (#324) has mentioned that running the installer with compatibility mode set as «Windows XP SP3» has given them success:
riclas commented Dec 9, 2013
that workaround does not work for me for the installer.
windows 7 64bit, java 1.7.0_45
lowenest commented Jan 1, 2014
multibit-0.5.16-windows-setup.exe,Windows 7 64-bit
C:\Program Files\Java\jdk1.7.0_45
C:\Program Files\Java\jre7
without any JRE or JDK on path»C:\Program Files (x86) » I has the same problem 。@jim618 thanks
gary-rowe commented Apr 10, 2014
MultiBit HD addresses this by bundling a JDK via JWrapper so I think this can be closed.
Bjonnfesk commented Dec 20, 2018
I won’t speak to MultiBit or JWrapper, but the exact same issue is present in JSmooth-wrapped applications. It will spit an error along the lines of «Java has not been found on your computer, would you like to download it?», even though the Java bin directory is added to the path variable and works fine with other applications. As with MultiBit, installing 32-bit Java alongside 64-bit works as a workaround.
You can’t perform that action at this time.
You signed in with another tab or window. Reload to refresh your session. You signed out in another tab or window. Reload to refresh your session.
Installer does not detect Java #39
Comments
rekkitcwts commented Sep 11, 2015
I happen to have Java installed but upon running the setup, I can’t install because it says that Java is not detected. My Java version is 1.8.0_51 and I’m running Windows 10.
The text was updated successfully, but these errors were encountered:
DarthJahus commented Sep 13, 2015
It’s JRE (Java Runtime Environement), that you need. Download and install JRE 6 and/or 7 from the official source. You may try this link.
Note that JRE 8 won’t solve your issue, and that you can install 6, 7 and 8 at the same time, with no problem.
sylveon commented May 7, 2016 •
Worked for me, and I was able to install the app.
I have the 1.8.0_92 JDK and JRE installed, along with JRE 1.7.0_80. The installer detected none, altough they are properly registered in the Java control panel.
And I have to do this anytime I want to run it
kevburnsjr commented Jan 6, 2018
Make sure to install the 32-bit version of Java, even if you are on a 64-bit computer. This fixed it for me.
https://java.com/en/download/manual.jsp
Download the «Windows Offline» version, not the «Windows Offline (64 bit)» version
DarthJahus commented Jan 6, 2018
Wow, never noticed that! Thank you, @kevburnsjr!
alanruiz010 commented May 16, 2021
mrpekr commented Jun 8, 2021
Sir @kevburnsjr you are a true Hero.
You can’t perform that action at this time.
You signed in with another tab or window. Reload to refresh your session. You signed out in another tab or window. Reload to refresh your session.
Не устанавливается Java на Windows
Работа некоторого программного обеспечения зависит от вспомогательных утилит и приложений. Поэтому пользователи желают быстрее решить проблему, когда не работает уже установленная Java. Ошибки могут возникнуть и раньше, когда не устанавливается приложение Java на компьютер с ОС Windows. Разберемся в каждой проблеме и узнаем, что делать.
Почему Java не скачивается
Чтобы ответить на вопрос, что делать, если модуль Джава не скачивается на компьютер, важно понять, почему установщик не выполняет функций по загрузке библиотек.
Загружаемый на компьютер файл не содержит требующихся компонентов, а просто скачивает необходимые файлы из виртуальных библиотек через интернет. Важно проверить работу файрволов, антивирусов и браузеров. Такое ПО блокирует фоновую загрузку Java.
Решение проблемы достигается двумя вариантами: настройка приложений или скачивание полноценного установщика с нашего и официального сайта Джава. Обновите антивирус, просмотрите параметры блокировок.
Ошибки при установке
Если файл скачался, а Java не устанавливается на Windows 7, 8, 10 или XP, то проблема глубже.
Способы решения проблемы:
С остальными ошибками Джава на Виндовс стоит познакомиться поближе.
Error Java Installer
Если не запускается установщик программы Java, обратите внимание на подключение к интернету. Лучше продолжить процесс в автономном режиме, скачав исполняемый файл с соответствующей пометкой.
Когда установленная Джава не открывается, то используется программа Windowsfix. ПО помогает в устранении сотен ошибок, включая те, что встречаются на Java.
Ошибка 1603
Ошибка Java с пометкой Error Code: 1603 появляется в процессе установки обновления. Причина до сих пор не выявлена разработчиками.
Предлагаются следующие способы решения:
После переустановки приложения верните флажок на место.
Ошибка 1618
Чтобы исправить ошибку Java 1618, воспользуйтесь следующей инструкцией:
Причина ошибки 1618 при установке Java на компьютер разработчиками не выяснена.
Unable to install Java
Java Destination Folder
Ошибка папки назначения Destination Folder возникает на 32-разрядных версиях ОС Windows. Для решения проблемы создается новая папка в следующей директории: «C:\Program Files (x86)». Если есть какое-то содержание, то его нужно удалить.
Не запускается Java
Для начала убедитесь, что при установке не возникало неполадок и системных сообщений.
Как запустить программу Java, если возникают ошибки:
Приложение работает постоянно, но в фоновом режиме. Иными словами, вопрос, как открыть программу Java на компьютере, не имеет ответа. Главное – настроить взаимодействие с браузерами.
Не устанавливается Java на Windows 7, 8 или 10 — произошла ошибка. Решение.

1. Обычно, при загрузке программного обеспечения с официального сайта, Вы скачиваете специальный веб-установщик, который будет затем сам тянуть нужные библиотеки через подключение к Интернет. Но тут может включить в игру антивирус или фаервол, который может расценить это как вирусную активность и заблокировать доступ в интернет установочному приложению. Поэтому попробуйте скачать полноценный офлайн-установщик отсюда — ссылка, а затем попробовать установить Джава через него. Не удивляйтесь, что он весит около 50 Мегабайт, в то время, как веб-установщик почти в 50 раз меньше. Это нормально.
2. Если у Вас до этого уже стояла более старая версия Java — попробуйте его удалить и поставить заново через Панель управления Windows.
3. Проверьте свою операционную систему Windows 7, 8 или 10 с помощью хорошей антивирусной программы. Например, DrWeb CureIt или Kaspersky Antivirus. Очень часто вредоносные программы маскируются под системные библиотеки и затем не дают их обновлять.
4. Почистите реестр Виндовс с помощью специальной утилиты. Например, CCleaner.
Именно ошибки в реестре часто являются причиной того, что ПО Java не устанавливается на компьютер.
5. Попробуйте почистить системные папки:
C:\ProgramFiles\Java
и
C:\ProgramFiles\Common Files\Java
Иногда файлы, оставшиеся от старых версий приводят к ошибке установки Джава.
6. Попробуйте обновить компоненты Windows с помощью Центра обновлений. Может случится такое, что ошибка установки Java Runtime Environment возникает даже из-за устаревшей версии Internet Explorer.
7. Скачайте фикс-файл с исправлениями здесь и примените изменения в реестре.
How to Fix «Java Runtime Environment not found» error
In this post, we will solve «Java Runtime Environment not found error«. This java error is one of the common error faced by developers or end-users. Whenever you try to install any software which requires java like eclipse or Minecraft. Also, if you are new to java development, JDK or Java Development Kit is necessary for you.
Following this tutorial will help you to resolve all Java runtime errors. Additionally, you will learn to install, remove and set java variables in Windows10 and Ubuntu.
Let’s understand some basic concepts of Java runtime first
what is a runtime environment
Target would be JRE or CLR for your program, need to decide by you. As soon as you execute any program, it’s in run time.
JRE vs JDK
| JRE | JDK |
|---|---|
| Stands for Java Runtime Environment | Stands for Java development kit |
| To run Java programs, you need JRE | Helps to build Java programs and applets |
| Platform dependent contains libraries and supporting tool | Platform dependent contains tools development and debugging |
| JRE does not contain development kit. | JDK includes JRE also to execute the program |
Simple JRE VS JDK
What are causes of «Java Runtime environment not found» error
Because JRE is platform-dependent, I have covered java installation, variable setup and un-installation for Windows and Ubuntu both.
Choose Windows 10 or Ubuntu 20.04 from the post and follow step by step to get java issues resolved.
Java download
Step1
Visit oracle.com and download JDK 15 or latest available for your system. I am downloading it for Windows 10 (64-bit). Latest available versions of java are listed in the screenshot. 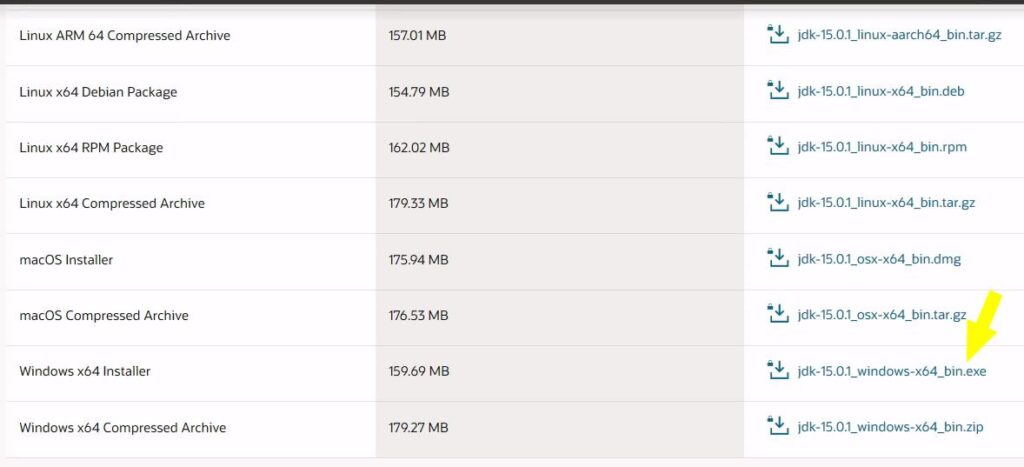
How to install Java runtime environment step by step
Let’s solve 1 st reason of «Java runtime environment not found«, Because of java is not installed.
Step2
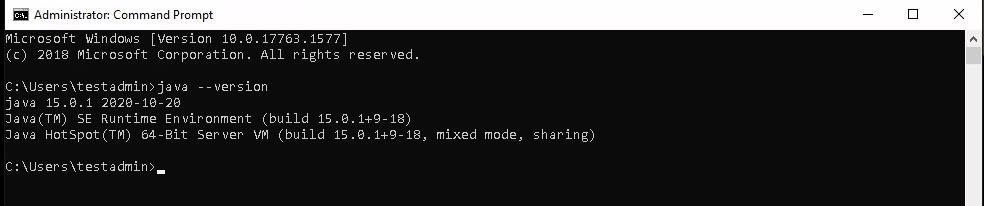
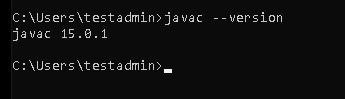
Open command prompt with «Run as administrator» and run java command.

How to install java runtime environment in Windows 10
Step3
Once Download completes. Browse to «jdk-15.0.1_windows-x64_bin.exe» file and double click on it, to run installer. Click Next. 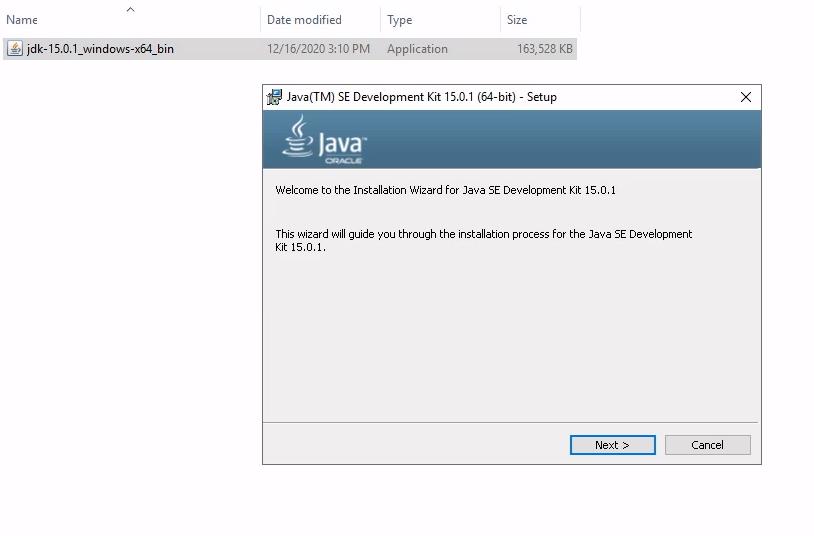
Step4
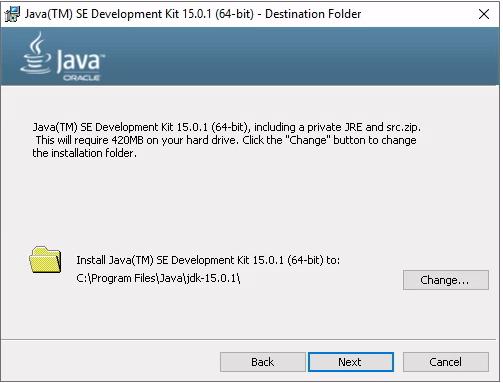
I recommend to keep «C:\Program files\java\jdk-15.0.1 (64-bit)» as default installation folder. Select Next.
You may select different installation folder also. For example, if you are installing second instance of java software. Click on change and browse for target folder.
Step5
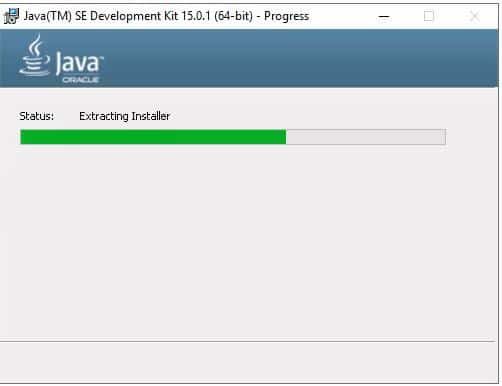
Let installation complete, it may take few minutes.
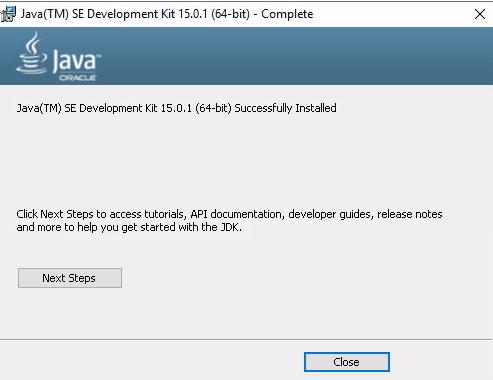
Step6
Click close. Now you are done with java installation on windows 10.
How to set environment variable for java in windows10
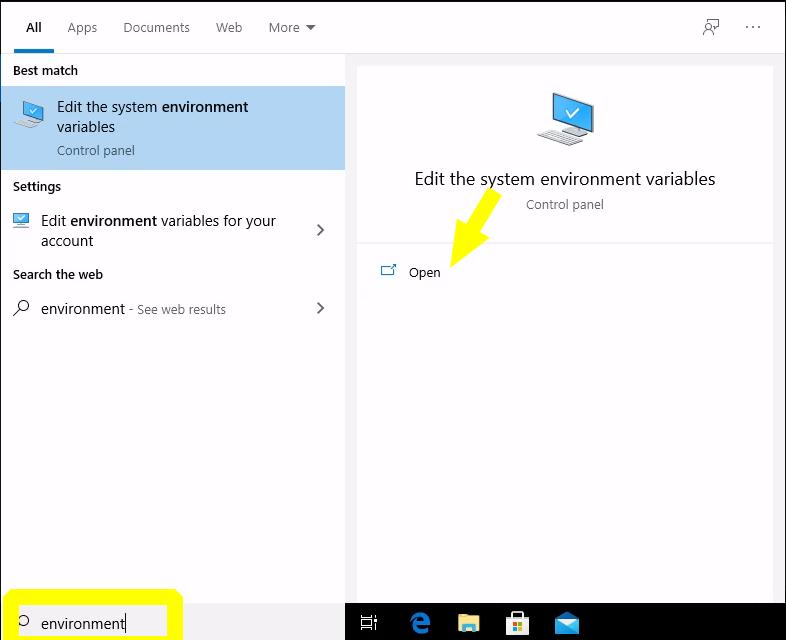
Step7
Type «environment» in search window. Click «open» on «Edit the system environment variables«
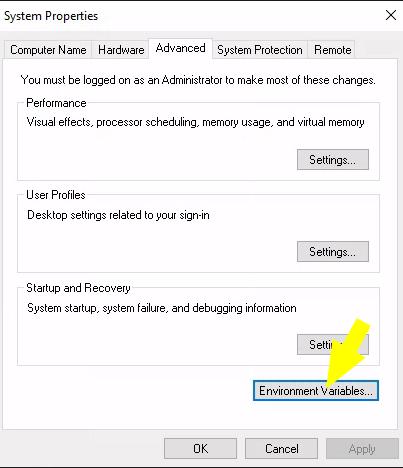
Step8
Click on Environment variables.
Step9
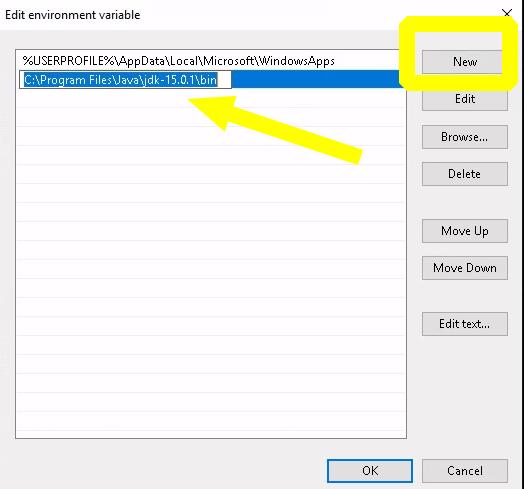
Select «Path» > Then click Edit.

Step10
Select New > Give path of java installation directory > For example, «C:\Program files\java\jdk-15.0.1\bin» in my case. If you have selected different folder for java installation in step4. You can enter your path till bin folder.
Click OK.
Step11
Set «classpath» for java. Click «New» in environment variable window. It allows to setup new environment variable.
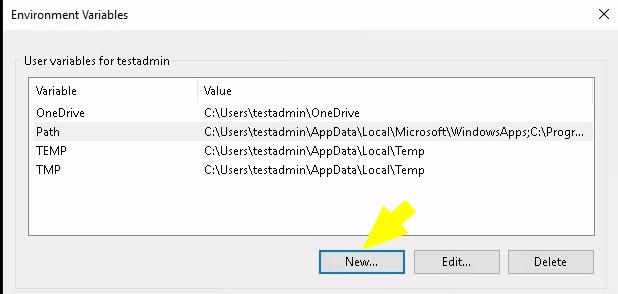
Step12
In «Variable name», enter «classpath«. Also in «variable value» provide path to your java installation till «lib» folder. In my case it is «C:\program files\java\jdk-15.0\lib > Select OK
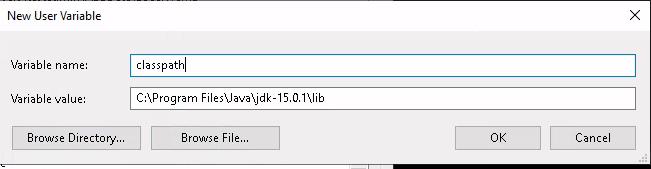
Close all open environment variables windows by selecting OK.
Installation and java variables have been setup. Now, Let’s validate java installation and version.
Step13
Open command prompt with «run as administrator» rights in windows 10.
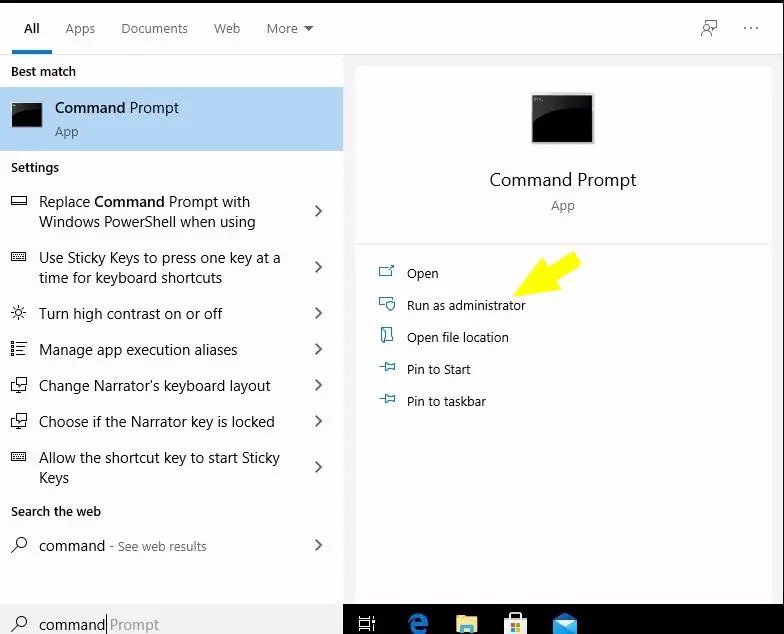
Step14
Run «java» command to check your Java and JRE (Java Runtime Environment) version.
Check java SDK version with javac command
Video tutorial-JRE error solved for Windows
«Java Runtime Environment not found» error fixed for windows 10
How to uninstall java from Windows 10
In case, you are not happy with your old java or JRE version and want to install new. For that, you need to remove old java version.
Cleanup of Java from windows 10 is pretty easy. Follow these steps to remove java from your system.
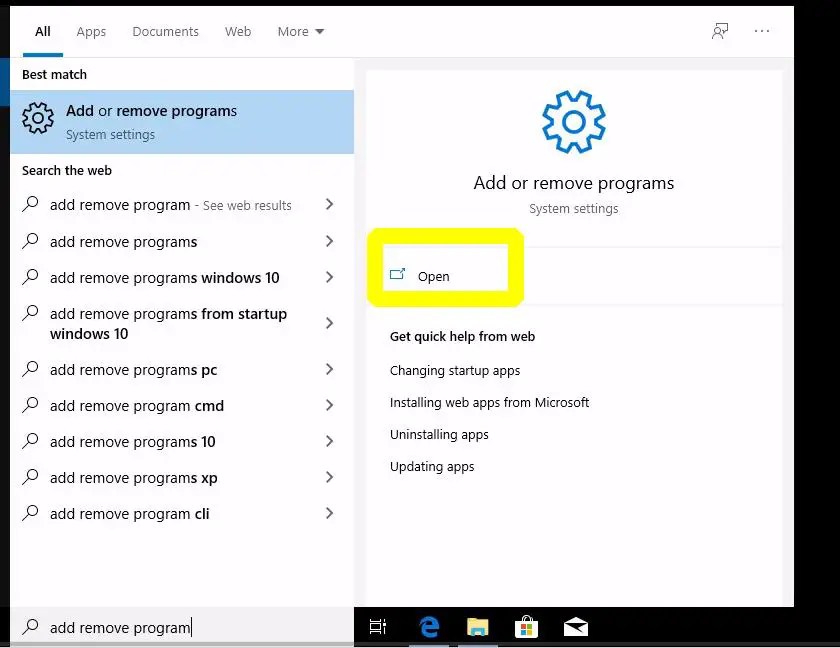
Step15
Search add or remove programs and click open
Step16
Select java program and click Uninstall.
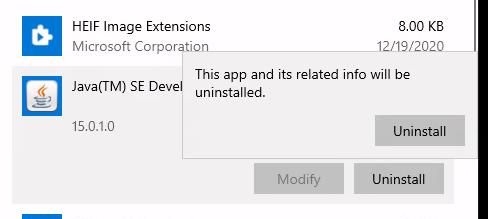
Java software will go from window. You can cleanup java variables also, setup in step10 and 11 earlier.
How to install java runtime environment in Ubuntu 20.04
There are two ways to download and install java or JDK in Ubuntu 20.04
A.) Using apt command
B.) Download Oracle JDK package and install manually
Let’s see both options one by one-
A.) How to install java or JRE in Ubuntu 20.04 using apt command
To install java in Ubuntu using repository, Follow these commands
Step17
Update package index using apt command

Step18
Check if you have any old java version installed in system. In my case, java is not installed.
output
Command ‘java’ not found, but can be installed with:
sudo apt install openjdk-11-jre-headless # version 11.0.9.1+1-0ubuntu1
Step19
Run «apt» command to install java or JRE. I will install default-jre version 2:1.11-72 in my Ubuntu system from list.
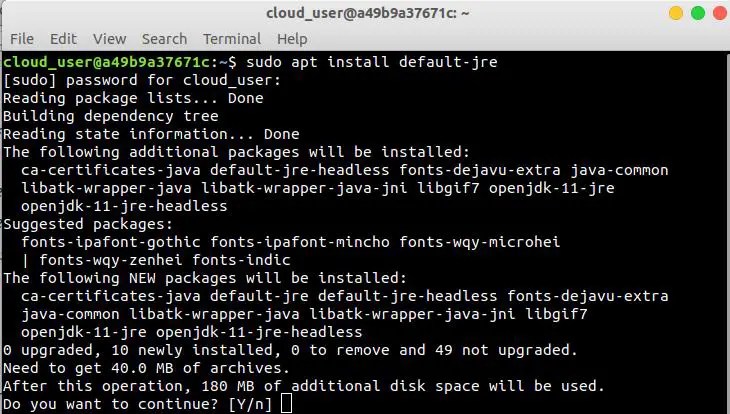
Select «Y» and press Enter. Let installation complete. it will take few minutes.
Step20
Check java version
output

How to Remove java from Ubuntu 20.04
Step21
Run apt command to remove JRE package installed. Press Y and then enter. 
B.) How to install latest java or JDK in Ubuntu 20.04 from oracle (manually)
Step22
Visit oracle.com and download JDK 15 or latest available .deb and transfer to your system. I am downloading Debian package jdk-15.0.1_linux-x64_bin.deb. 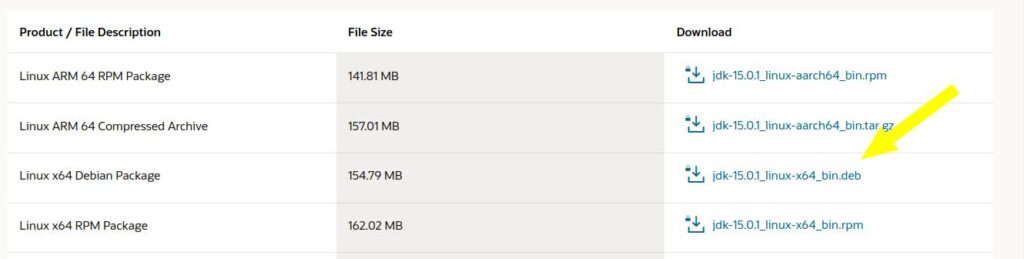
Alternatively, you can download java using wget command.
Reference output 
Step23
Rename .deb file using mv command, if required. Then install Debian package using dpkg command.
output 
Default installation directory path of java would be «/usr/lib/jvm/jdk-15.0.1/«. So, make a note of it, as it will be required to set up a Java_HOME variable.
How to set «JAVA_HOME» variable in Ubuntu 20.04
Set JAVA_HOME variable for all users in Ubuntu by editing environment file.
Step24
Edit /system/environment file
Add path «/usr/lib/jvm/jdk-15.0.1/bin» to the last of the environment file. Then, save and exit.

Run source command to execute changes made in environment file.
Step25
Check your java version

Remove java runtime environment package using dpkg command
Step26
Run dpkg command with —purge option to completely clean java from Ubuntu 20.04
For example, 
Video on «How to fix java runtime environment error in Ubuntu 20.04»
To view this video please enable JavaScript, and consider upgrading to a web browser that supports HTML5 video