Обходной путь для установки Ubuntu 20.04 с системами Intel RST
Я уменьшил объем 1 ТБ на 150 ГБ и попытался установить туда.
Но установщик Ubuntu не позволил мне, так как я получил диалоговое окно после того, как настройка клавиатуры сказала «Отключить RST» с сообщением
В этом компьютере используется Intel RST (технология быстрого хранения). Перед установкой Ubuntu необходимо отключить RST. Для получения инструкций откройте эту страницу: help.ubuntu.com/rst
Если я внесу какие-либо изменения в настройки BIOS, например переключу контроллер Intel с RAID на AHCI, Windows не загрузится и перейдет в Восстановление системы.
При перезапуске вы не получите GRUB, но вместо этого по умолчанию загрузится Ubuntu. Если вам нужно загрузить Windows, вам придется заходить в BIOS и каждый раз выбирать вариант загрузки UEFI.
После завершения установки 18.04 вы можете обновить его до 20.04.
После обновления я установил рабочий стол KDE и на экране входа в систему выбрал вариант «Ubuntu on Wayland».
После выполнения этих двух действий я потерял новые функции 20.04, такие как экран загрузки Ubuntu с логотипом Dell и экран с эффектом размытия при выключении / выходе из системы. Не знаю, как это вернуть.
1 ответ
У вас есть один жесткий диск / твердотельный накопитель, настроенный в режиме RAID (RST), и установщик Ubuntu не распознает ваш жесткий диск / твердотельный накопитель, пока вы не переключите настройку диска в BIOS с RAID на AHCI.
Однако выполнение этого переключения сопряжено с некоторыми проблемами, поскольку Windows больше не загружается.
Вам не нужно переустанавливать Windows.
Ниже вы найдете два разных способа решения этой проблемы. Некоторые пользователи нашли вариант №2 проще.
Важно: убедитесь, что у вас есть резервные копии важных файлов Windows!
Выбор #1: Глядя на эту статью покажет вам, как сделать изменения без переустановки Windows.
Важно: некоторые пользователи сообщили, что полностью не могут загрузить Windows после использования варианта №1 без полного восстановления.
Теперь вы сможете установить Ubuntu в конфигурации с двойной загрузкой.
Вариант №2: смотрите здесь.
Ubuntu Documentation
Overview
Intel Rapid Storage Technology (RST) is a solution built into a range of Intel chipsets. On platforms that have RST support built and enabled in the computer’s BIOS, it allows users to group and manage multiple hard disks as single volumes. This functionality is known as the Redundant Array of Independent Disks (RAID).
A complete user guide is available through the official Intel documentation.
RST & Ubuntu installation
If you intend to install Ubuntu on a computer that supports RST functionality, you may need to make operational adjustments to your setup before you can proceed.
By default, the Ubuntu installer can detect certain RAID configurations, but it may not necessarily be able to access and use the hard disks grouped in them.
If the Ubuntu installer cannot detect the hard disks you need, then before you can install Ubuntu, you will need to turn RST in the computer’s BIOS. The exact terminology and steps required to access and manage RST in BIOS often depend on the specific implementation by the platform vendor. For instance, Dell computers may have different settings from Lenovo or HP computers.
Furthermore, you may already have Windows installed on the computer that uses RST. If you disable RST in the BIOS or change the RST configuration, Windows may become unbootable, as it may no longer be able to find and use the hard disks.
Possible installation scenarios
Broadly, there are two main configurations you may encounter when you try to install Ubuntu on a computer that supports and uses RST:
RST used and enabled, no operating system installed.
RST used and enabled, Windows installed.
RST enabled, no operating system installed.
Again, there are two possible scenarios here:
The Ubuntu installer correctly detects the hard disks and can use them. In this case, you can proceed normally.
The Ubuntu installer detects a conflict with RST and will notify the user that RST configuration is required.
The latter scenario can be resolved by either one of the two changes:
Turning RST off completely in BIOS.
Changing the storage controller protocol from RST to Advanced Host Controller Interface (AHCI).
AHCI is a relatively new specification that describes how computer storage is accessed and managed, and it supersedes several older specifications. It is primarily designed to utilize advanced features of hard drives connected via the Serial ATA (SATA) bus. Typically, these will be 2.5-in and 3.5-in hard disks, including both mechanical and SSD devices. The change from RST to AHCI may result in the loss of some of the advanced functionality that the RST module offers (for instance TRIM for SSD).
The exact terminology and steps required to access and manage controller type in BIOS often depend on the specific implementation by the platform vendor.
RST enabled, Windows installed
Similarly, there are two possible scenarios available:
The Ubuntu installer correctly detects the hard disks and can use them. In this case, you can proceed normally. You will need to create a side-by-side configuration for Windows and Ubuntu.
The Ubuntu installer detects a conflict with RST and will notify the user that RST configuration change is required. In this case, the change will affect the installed Windows operating system.
Caution: Please note that changes to storage configuration can be destructible and lead to irrecoverable loss of data. If you break a RAID setup, your data may no longer be accessible. Likewise, if you change the controller type from RST to AHCI, Windows may no longer be able to boot.
How to safely re-configure Windows to use AHCI
If the Ubuntu installer detects RST, and you have Windows installed on your system, there are several steps you need to do to allow Ubuntu to install side by side with Windows, without any loss of data and functionality.
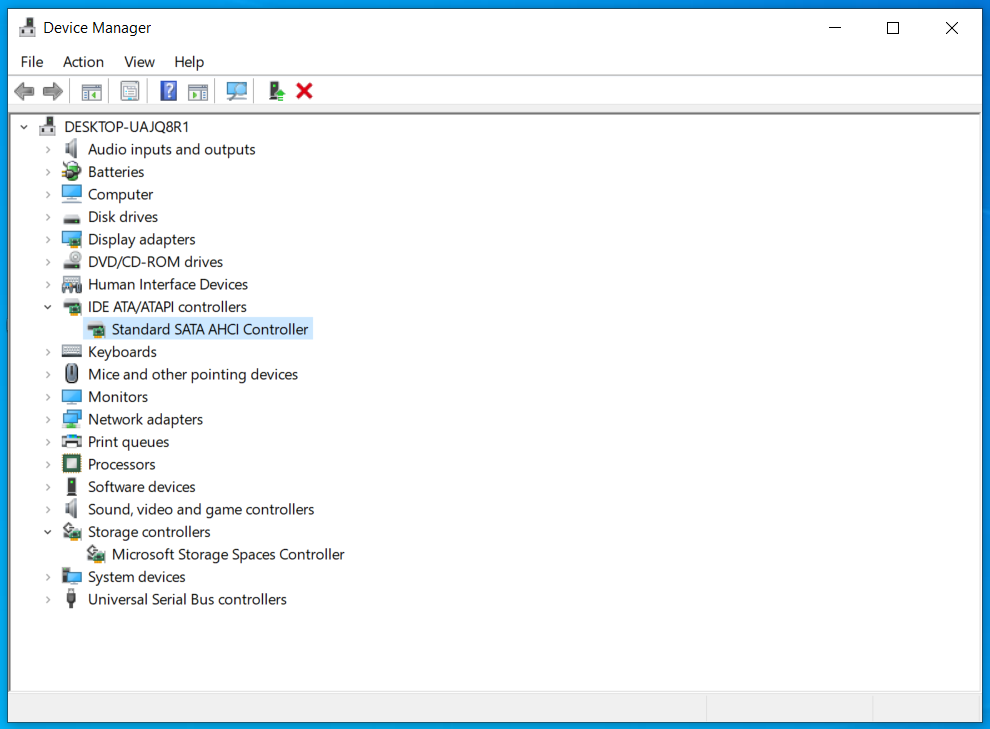
Verify which controller mode is in use in Windows. You can do this through the Device Manager. If the controller mode is set to anything other than “Standard SATA AHCI Controller”, then you will need to make a change that allows Windows to boot safely in AHCI mode. This can be done using the Registry Editor.
Start Registry Editor, and navigate to:
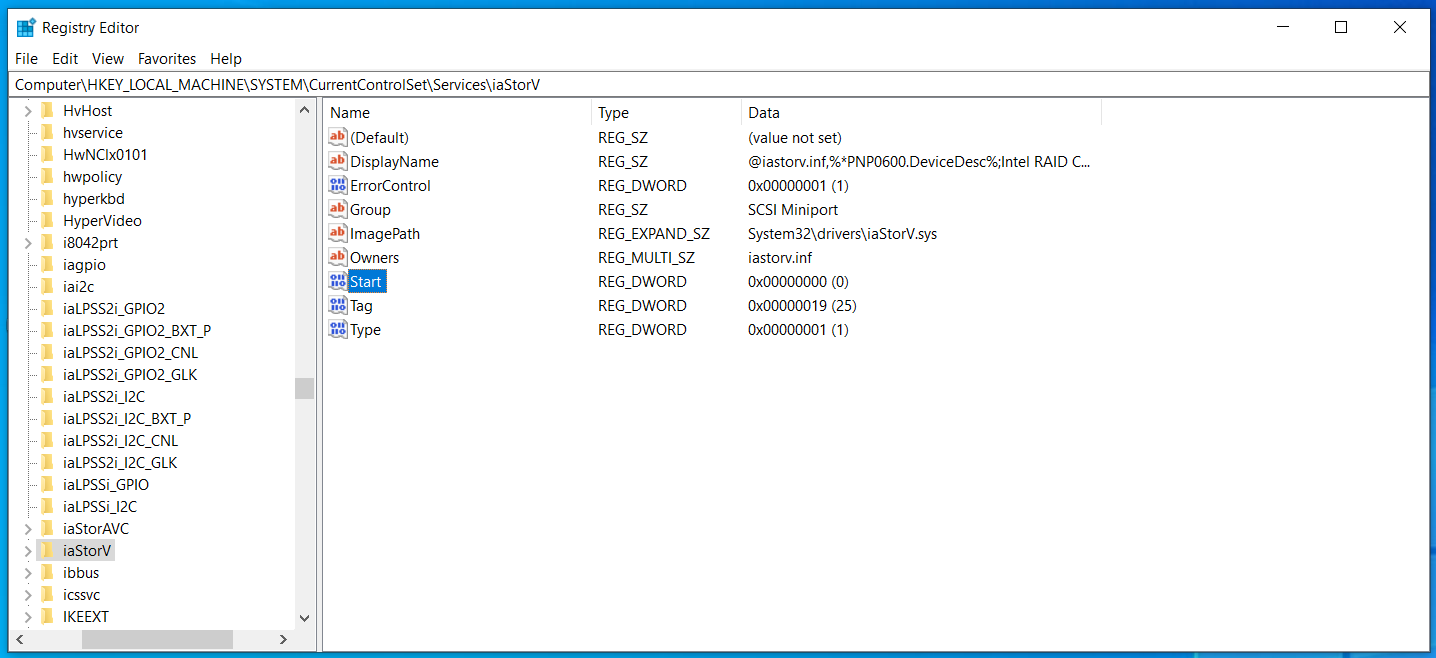
Here, in the right column, double-click on the Start key, and change its value to 0.
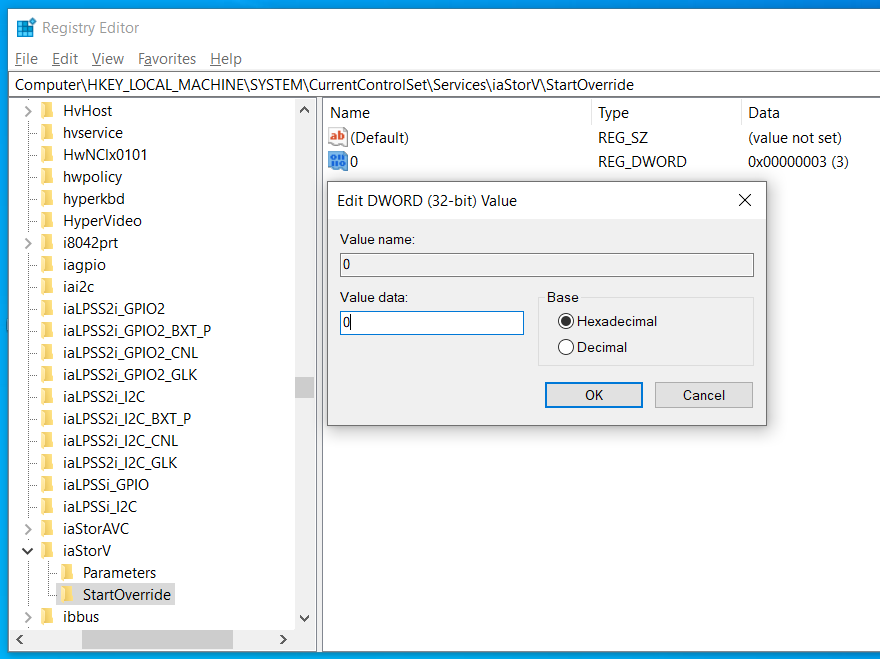
Next, double-click on the iaStorV entry in the left column to expand it, select the StartOverride entry, and then in the right column, change the value of the key 0 to 0.
Repeat this set of changes for the following path in the Registry Editor:
Once this step is complete, reboot Windows and start your computer’s BIOS. Normally, BIOS is accessed by hitting the F2 or Del key during the early boot sequence. In the BIOS menu, change the hard disk controller type to AHCI. The exact terminology and steps required to access and manage controller type in BIOS often depend on the specific implementation by the platform vendor.
Exit BIOS, and let the system boot. Windows should load normally, and you can check the controller mode in the Device Manager. It should read: Standard SATA AHCI Controller.
Possible boot problems
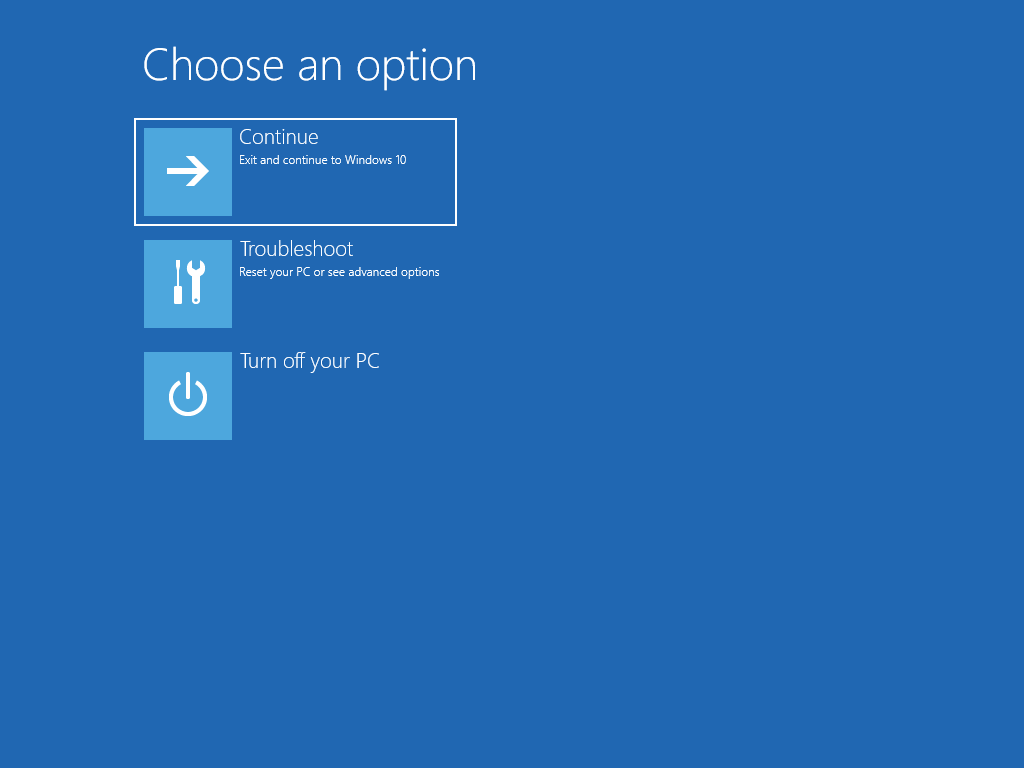
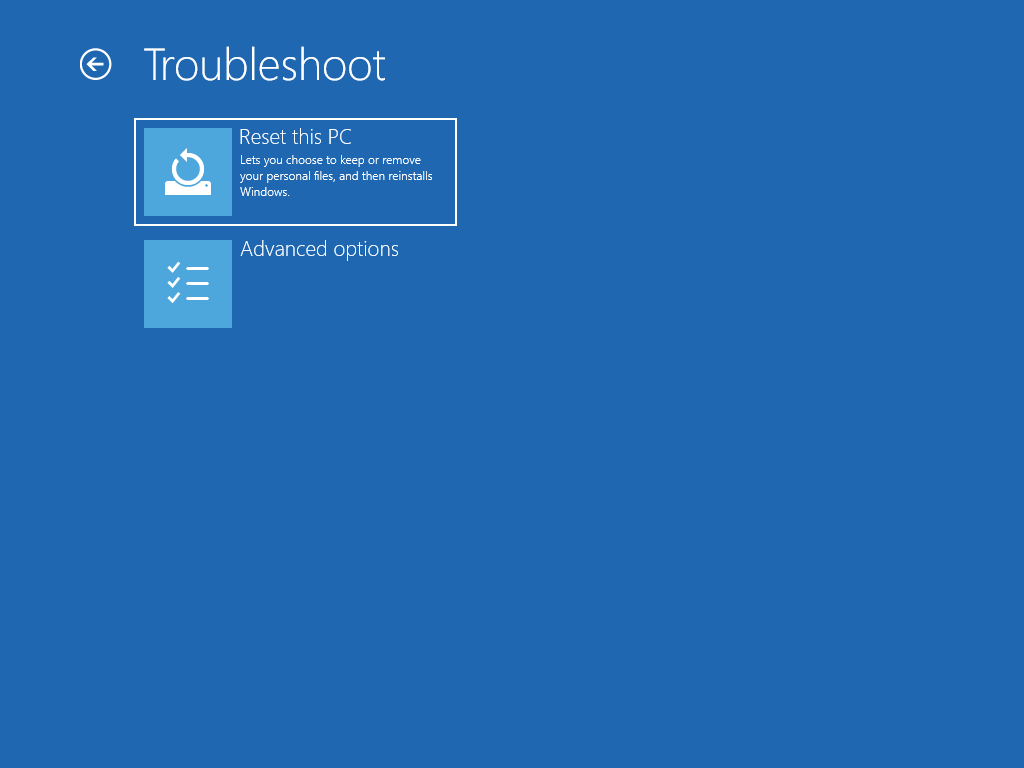
After making the necessary changes to allow Ubuntu to install side by side with Windows, you may encounter a situation where Windows no longer boots. For instance, this could happen if you made the BIOS change without making the registry changes in Windows. In this case, you will need to recover your Windows.
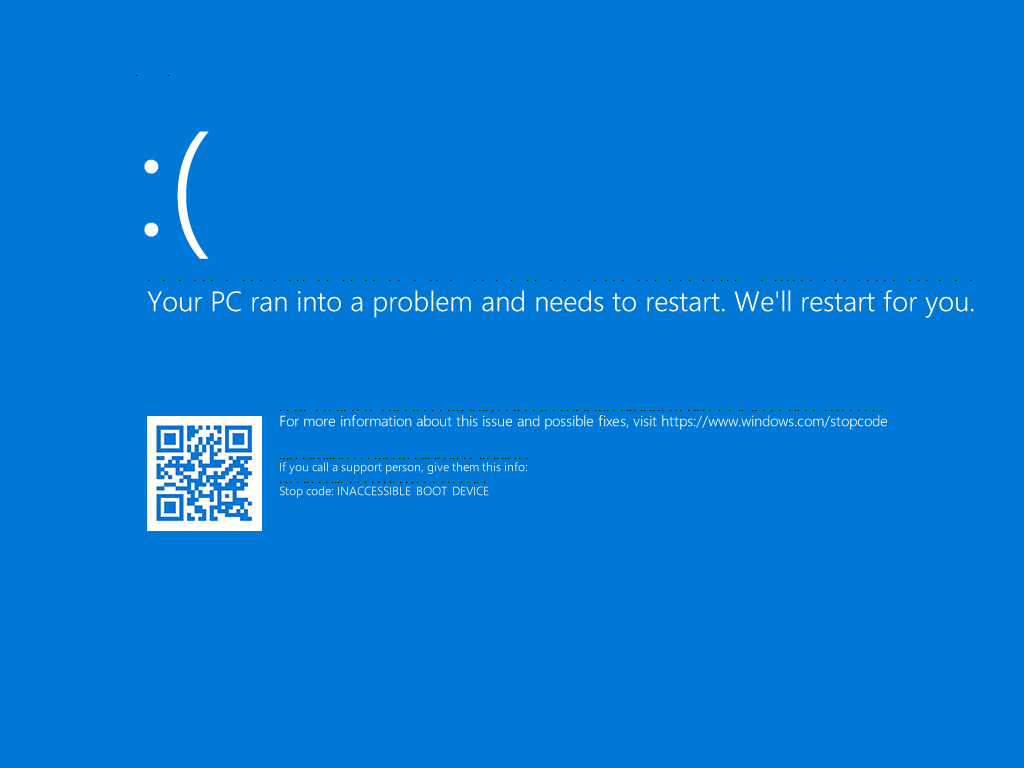
You will most likely see a blue screen with a Stop code: INACCESSIBLE BOOT DEVICE.
Windows will attempt to restart and automatically diagnose and repair the boot-related problems, but it will most likely not be able to complete the task itself, and you will need to manually launch the command prompt from the recovery screen, and fix the issue.
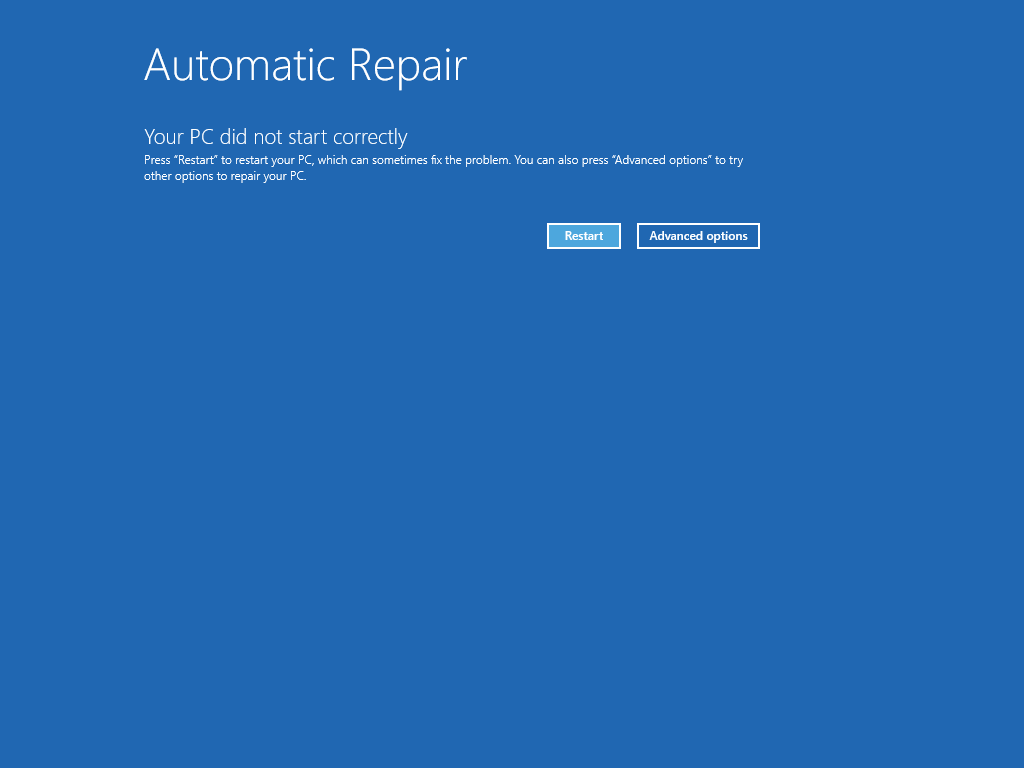
On the screen that gives you the result of the Automatic Repair, click on Advanced Options. Under Choose an option, select Troubleshoot. Next, selected Advanced Options again. Finally, select Command Prompt.
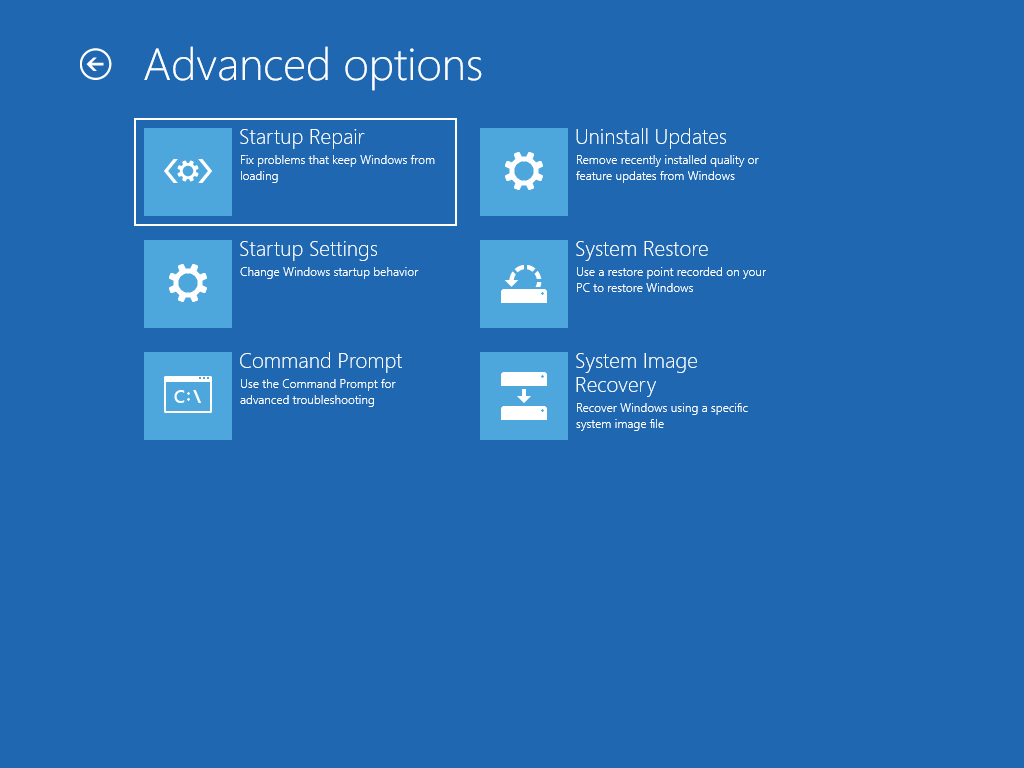
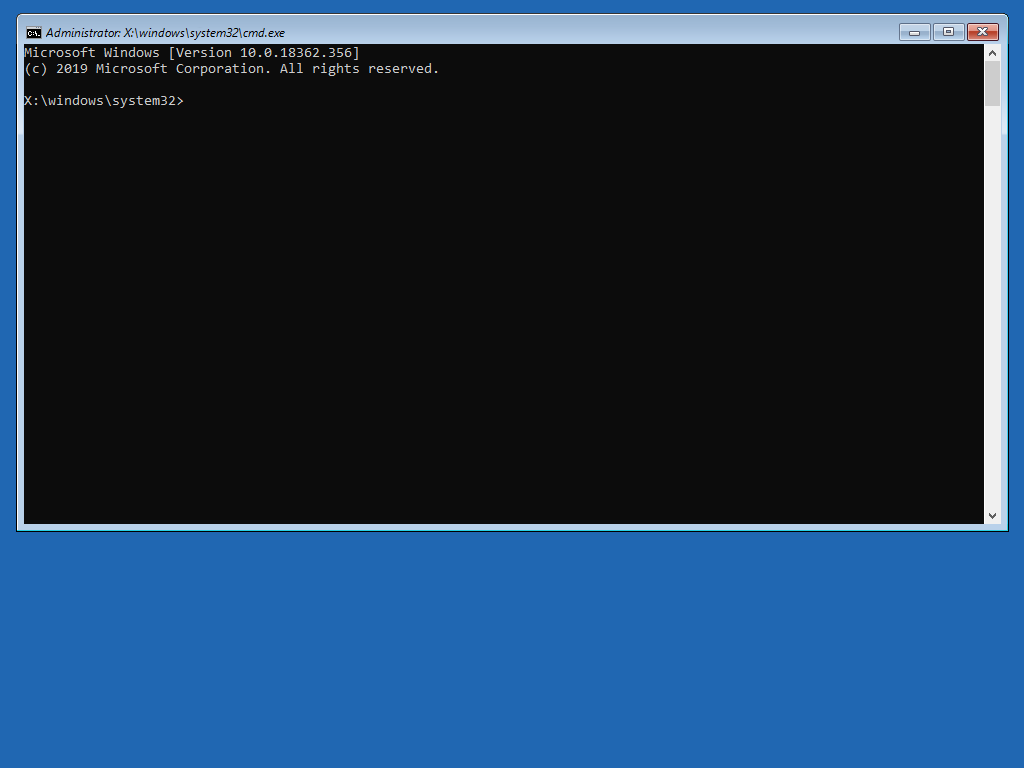
Command prompt, diskpart and bcdedit
This will launch the Windows command prompt, where you can run commands to diagnose and repair problems, including boot-related issues. The first step is to run the disk partition tool to see and understand the disk layout.
The full sequence of commands is as follows:
For example, a “wrong” volume may be assigned the letter C:, so you will need to select it first, assign it a different letter (e.g.: F: or H:), select the volume that contains Windows, and then assign it the letter C:.
Finally, activate the C: volume, and exit the diskpart utility.
Now, run the bcdedit repair command:
If the above does not work, alternative commands you can run are:
If this command completes successfully, exit the command prompt, the Windows recovery console will restart, and Windows should load normally, with the controller mode set to AHCI.
If Windows does not start correctly, you can then manually recreate the bootloader file.
To this end, you will need to access either the System partition or the EFI partition on your computer. The Windows disk layout will typically include one of these two configurations:
A volume that contains Windows (C:) and a small hidden partition, usually 100MB in size called System partition, formatted as NTFS. It contains the files needed to start (boot) Windows, as well as recovery tools to help you diagnose and repair your system when it does not start correctly.
On UEFI-powered computers, a volume that contains Windows (C:) and a boot partition (also called EFI), typically 256-512MB in size, formatted as FAT32. This partition will contain the files needed to start (boot) Windows.
You will need to access the partition to make the necessary changes. If you have already run the diskpart utility, you do not need to do anything at this point, you only need to check the letter that is assigned to this partition (e.g.: letter F:).
Switch to the boot partition, move the existing boot file aside, and then create a new one. The sequence of commands to do this is as follows (assuming letter F: for the boot partition):
The bcdboot command will initialize the system partition by using BCD files from the C:\Windows folder, use the en-us locale (/l en-us), target the system partition assigned letter F: (/s option), and create boot files both for UEFI and BIOS (/f ALL option).
Once this command completes, reboot. Windows should start normally. You can now re-launch the Ubuntu installer and finish the side-by-side setup of the two operating systems.
The material in this document is available under a free license, see Legal for details.
For support please use Ask Ubuntu.
Я пытаюсь отключить RST, чтобы установить ubuntu вместе с win10, но win10 продолжает отменять мои изменения. Что я могу сделать?
При использовании этого официального руководства ( https://discourse.ubuntu.com/t/ubuntu-installation-on-computers-with-intel-r-rst-enabled/15347) Windows отменяет мои изменения после перезагрузки.
Я также пробовал следующее, что видел на нескольких сайтах:
Однако, когда я перезагружаюсь после отключения безопасной загрузки, win10 возвращается к использованию RSI, забирая с собой UEFI.
Я использую новый Medion Erazer P17613, безопасная загрузка / быстрый запуск отключены. Я планирую, что Ubuntu будет моей основной ОС и мне нужно будет загружаться в Windows только в том случае, если она мне нужна для работы uni и не могу заставить ее работать в виртуальном боксе, поэтому решение, которое предполагает, что я должен войти в UEFI для переключения ОС, будет работоспособный, хотя и не оптимальный.
edit: я не знаю, почему askubuntu продолжает говорить мне, что это дубликат, потому что вопрос, на который он ссылается, НЕ имеет постоянного возврата, который я вставил в заголовок и первый абзац.
Тем не мение. Уни начался, так что у меня больше нет времени. Я прошиваю Windows и просто запускаю ее в виртуальной машине. это правка в основном объясняет, почему я больше не буду проверять эту ветку. Спасибо, в любом случае.
Снова редактирование, потому что. это была не Windows все это время. У меня возникли проблемы с установкой (ошибка стороннего программного обеспечения), а затем RST снова включился (?!)
поэтому я снова искал безопасную загрузку, нашел это, пошел попробовать и заметил еще один вариант безопасной загрузки на вкладке безопасности, который не был тем, который я нашел ранее, попробовал его из любопытства, и он сработал.
просто для записи: мне не нужно было вводить пароль супервизора. Я не знаю, требуется ли отключить только эту или другую безопасную загрузку, но.
Приношу свои извинения за предположение, что причиной проблемы была Windows, которая, вероятно, ни к чему не помогала. для всех, у кого есть эта проблема, формулировка может быть не такой очевидной, как вы думаете, она должна быть (я невероятно буквально), поэтому ищите все, даже немного связанное с безопасностью.
снова отредактируйте, пытаясь переустановить, чтобы убедиться, и RST снова включен?!
v извиняюсь за то, что нижеприведенная информация немного длинна. Я не хочу быть человеком, который «нашел решение, но не опубликовал его», и я пишу это по ходу дела.
отредактируйте, надеюсь, в последний раз: я прошел момент, когда он сказал мне, что RST включен, переключив порядок загрузки на загрузку с USB, прежде чем что-либо еще, а также снова выключил RST, пока я был в BIOS в этот момент. это давало как можно меньше времени между отключением RST и установкой с USB.
Обходной путь для установки Ubuntu 20.04 с системами Intel RST
Я пытался установить Ubuntu 20.04 в моем Dell G5, который имеет 2 диска. Один с Windows 10 на нем (256 ГБ) и другой с емкостью 1 ТБ.
Я сократил объем 1 ТБ на 150 ГБ и попытался установить его.
Но установщик Ubuntu не разрешил мне, так как я получил диалоговое окно после того, как настройка клавиатуры сказала «Отключить RST» с сообщением
Этот компьютер использует Intel RST (Rapid Storage Technology). Тебе надо отключите RST перед установкой Ubuntu. Для получения инструкций откройте этот page: help.ubuntu.com/rst
Если я сделаю какие-либо изменения в настройках BIOS, например, при изменении контроллера Intel с RAID на AHCI, Windows не загрузится и перейдет в System Recovery.
У меня не было этой проблемы при установке 18.04. При создании разделов необходимо создать раздел EFI объемом 200–500 МБ с обычными шагами, и установка будет успешно завершена.
При перезапуске вы не получите GRUB, вместо этого Ubuntu загрузится по умолчанию. Если вам нужно загрузить Windows, вам придется каждый раз заходить в BIOS и выбирать вариант загрузки UEFI.
После завершения установки 18.04 вы можете обновить ее до 20.04.
После обновления я установил рабочий стол KDE и на экране входа в систему я выбрал опцию «Ubuntu on Wayland».
После выполнения этих двух вещей, Я потерял новые функции 20.04, такие как загрузочный экран Ubuntu с логотипом Dell и экран эффекта размытия при выключенном питании / выходе из системы. Не уверен, как вернуть это.
1 ответ
У вас есть один жесткий диск / SSD, настроенный в режиме RAID (RST), и установщик Ubuntu не распознает ваш жесткий диск / твердотельный накопитель, пока вы не переключите настройку диска в BIOS с RAID на AHCI.
Однако при установке этого переключателя возникают некоторые проблемы, поскольку Windows больше не загружается.
не нужно переустанавливать Windows.
Ниже вы найдете два разных способа решения этой проблемы. Некоторые пользователи сочли Вариант №2 более простым.
Важно: Убедитесь, что у вас есть резервная копия ваших важных файлов Windows!
Использовать Intel RST в то время как двойная загрузка Ubuntu?
Я должен был отключить Intel RST в своем BIOS для установки Ubuntu, и все хорошо работает, однако когда я попытался повторно включить RST в Ubuntu BIOS, не загрузится (Windows, конечно, загружается прекрасный).
Есть ли я способ, которым я могу иметь Intel RST (и память Optane) работающий в Windows и все еще смочь загрузиться в Ubuntu? Я понимаю, что Ubuntu не может использовать эти функции, но я хотел бы все еще смочь использовать их, когда я загружаюсь в Windows.
Править: Так, Ubuntu не имеет никаких проблем с RST отдельно. Проблемные ребра, когда я включаю «Режим Optane», после которого не загрузится Ubuntu (см. сообщения об ошибках здесь). Когда я загружаюсь от USB, ни один из жестких дисков не обнаруживается.
Вот два экрана сообщений об ошибках, о которых сообщают во время начальной загрузки личинки:

1 ответ
Ошибка: Вы не можете ускорить Windows & Ubuntu одновременно
Можно использовать, используют Intel RST, чтобы ускорить диск Windows к SSD (обычно PCIe mSata на ноутбуке) и Улучшить IO для ускорения Linux (Ubuntu) одновременно, но не одновременно, конечно.
Нахождение сообщений об ошибках во время Начальной загрузки Ubuntu
Сообщениями об ошибках по умолчанию скрыты для большинства пользователей во время grub загрузитесь и «фиолетовый экран-заставка появляется» во время второй половины начальной загрузки личинки. Исправить это использование:
Ищите строку, содержащую:
Могут быть другие опции на этой строке, которой Вы не должны касаться. Удалите опции «тихий всплеск», чтобы видеть, что сообщения об ошибках во время загружаются. Оставьте двойные кавычки («) вначале и окончание списка параметров.
Сохраните файл, выход и затем введите:
Примечание: При использовании Intel RST необходимо сначала замедлить диск Windows перед вводом update-grub или update-initramfs когда личинка установлена на том же диске как ускоренный Windows.
Сводка
Я обновлю этот ответ, поскольку новая информация предоставляется OP. По совпадению это было дисковое ускорение в соответствии с Ubuntu 14.04, которая принесла мне для Выяснения у Ubuntu во-первых. Можно искать, мои самые первые несколько сообщений здесь для получения информации об использовании Улучшают IO для ускорения Ubuntu.