This effect requires gpu acceleration что делать premiere pro
Загрузка больших проектов в 10 раз быстрее по сравнению со стандартной CPU реализацией. Поддержка работы с множеством эффектов коррекции цвета примененных к нескольким клипам на Timeline. Благодаря аппаратной поддержке 32-bit цветов, с помощью Adobe Mercury Playback вы можете беспрепятственно работать с изображениями и секвенциями с большой детализацией и глубиной цвета.
А также CUDA — это технология (архитектура, язык программирования и т. Д.) Для обработки определенного вида графического процессора. CUDA — это технология Nvidia, поэтому ее предоставляют только карты Nvidia.
И OpenCL — это технология, которая по своему назначению похожа на CUDA. Функции OpenCL предоставляются многими графическими картами, в том числе ATI / AMD.
Это видео ролик, где я рассказываю про GPU ускорение
Premiere Pro GPU ускорение CUDA
Если у вас видеокарта NVIDIA. то попробуйте такой вариант. Все в ролике, он чуть больше одной минуты.

Распространенным заблуждением является то, что обработка CUDA / OpenCL используется только для рендеринга предварительного просмотра. Это неправда. Обработка CUDA / OpenCL также может использоваться для рендеринга окончательного вывода.
Не все видеокарты поддерживают эти технологии. Здесь Вы можете посмотреть системные требования
Adobe Premiere Pro CC https://helpx.adobe.com/ru/premiere-pro/system-requirements.html#gpu-acceleration
Nvidia/CUDA
Мобильные чипсеты
NVIDIA GeForce GT 650M (CUDA)
NVIDIA GeForce GTX 675MX (CUDA)
NVIDIA GeForce GTX 680MX (CUDA)
Дискретные чипсеты
NVIDIA GeForce GTX 285 (CUDA)
NVIDIA GeForce GTX 470 (CUDA)
NVIDIA GeForce GTX 570 (CUDA)
NVIDIA GeForce GTX 580 (CUDA)
NVIDIA GeForce GTX 680 (CUDA)
NVIDIA GeForce GTX 690 (CUDA)
Профессиональные чипсеты
NVIDIA Quadro CX (CUDA)
NVIDIA Quadro FX 3700M (CUDA)
NVIDIA Quadro FX 3800 (CUDA)
NVIDIA Quadro FX 3800M (CUDA)
NVIDIA Quadro FX 4800 (CUDA)
NVIDIA Quadro FX 5800 (CUDA)
NVIDIA Quadro 2000 (CUDA)
NVIDIA Quadro 2000D (CUDA)
NVIDIA Quadro 2000M (CUDA)
NVIDIA Quadro 3000M (CUDA)
NVIDIA Quadro 4000 (CUDA)
NVIDIA Quadro 4000M (CUDA)
NVIDIA Quadro 5000 (CUDA)
NVIDIA Quadro 5000M (CUDA)
NVIDIA Quadro 5010M (CUDA)
NVIDIA Quadro 6000 (CUDA)
NVIDIA Quadro K2000 (CUDA)
NVIDIA Quadro K2000M (CUDA)
NVIDIA Quadro K3000M (CUDA)
NVIDIA Quadro K4000 (CUDA)
NVIDIA Quadro K4000M (CUDA)
NVIDIA Quadro K5000 (CUDA)
NVIDIA Quadro K5000M (CUDA)
NVIDIA Tesla C2050 (CUDA)
NVIDIA Tesla C2070 (CUDA)
NVIDIA Tesla C2075 (CUDA)
NVIDIA Tesla M2050 (CUDA)
NVIDIA Tesla M2070 (CUDA)
NVIDIA Tesla K10 (CUDA)
NVIDIA Tesla K20 (CUDA)
Список поддерживаемых видеокарт для платформы Mac
ATI Radeon HD 6750M (OpenCL)
ATI Radeon HD 6770M (OpenCL)
NVIDIA GeForce GTX 285 (CUDA)
NVIDIA GeForce GTX 675MX (CUDA)
NVIDIA GeForce GTX 680 (CUDA)
NVIDIA GeForce GTX 680MX (CUDA)
NVIDIA GeForce GT 650M (CUDA)
NVIDIA Quadro CX (CUDA)
NVIDIA Quadro FX 4800 (CUDA)
NVIDIA Quadro 4000 (CUDA)
NVIDIA Quadro K5000 (CUDA)
ATI/AMD/OpenCL
Мобильные чипсеты
ATI Radeon HD 6650M (OpenCL)
ATI Radeon HD 6730M (OpenCL)
ATI Radeon HD 6750M (OpenCL)
ATI Radeon HD 6770M (OpenCL)
ATI Radeon HD 7510M (OpenCL)
ATI Radeon HD 7530M (OpenCL)
ATI Radeon HD 7550M (OpenCL)
ATI Radeon HD 7570M (OpenCL)
ATI Radeon HD 7590M (OpenCL)
ATI Radeon HD 7610M (OpenCL)
ATI Radeon HD 7630M (OpenCL)
ATI Radeon HD 7650M (OpenCL)
ATI Radeon HD 7750M (OpenCL)
ATI Radeon HD 7770 (OpenCL)
ATI Radeon HD 7770M (OpenCL)
ATI Radeon HD 7870M (OpenCL)
ATI Radeon HD 7970M (OpenCL)
ATI Radeon HD 8550M (OpenCL)
ATI Radeon HD 8570M (OpenCL)
ATI Radeon HD 8670M (OpenCL)
ATI Radeon HD 8690M (OpenCL)
ATI Radeon HD 8730M (OpenCL)
ATI Radeon HD 8750M (OpenCL)
ATI Radeon HD 8770M (OpenCL)
ATI Radeon HD 8790M (OpenCL)
Дискретные чипсеты
ATI Radeon HD 6750 (OpenCL)
ATI Radeon HD 6770 (OpenCL)
ATI Radeon HD 6950 (OpenCL)
ATI Radeon HD 6970 (OpenCL)
ATI Radeon HD 7570 (OpenCL)
ATI Radeon HD 7670 (OpenCL)
ATI Radeon HD 7670M (OpenCL)
ATI Radeon HD 7690M (OpenCL)
ATI Radeon HD 7730M (OpenCL)
ATI Radeon HD 7750 (OpenCL)
ATI Radeon HD 7850 (OpenCL)
ATI Radeon HD 7850M (OpenCL)
ATI Radeon HD 7870 (OpenCL)
ATI Radeon HD 7950 (OpenCL)
ATI Radeon HD 7970 (OpenCL)
ATI Radeon HD 8470 (OpenCL)
ATI Radeon HD 8570 (OpenCL)
ATI Radeon HD 8670 (OpenCL)
ATI Radeon HD 8740 (OpenCL)
ATI Radeon HD 8760 (OpenCL)
ATI Radeon HD 8870 (OpenCL)
TI Radeon HD 8950 (OpenCL)
ATI Radeon HD 8970 (OpenCL)
Профессиональные чипсеты
ATI FirePro M2000 (OpenCL)
ATI FirePro V3900 (OpenCL)
ATI FirePro M4000 (OpenCL)
ATI FirePro V4900 (OpenCL)
ATI FirePro W5000 (OpenCL)
ATI FirePro V5900 (OpenCL)
ATI FirePro M5950 (OpenCL)
ATI FirePro M6000 (OpenCL)
ATI FirePro S7000 (OpenCL)
ATI FirePro W7000 (OpenCL)
ATI FirePro V7900 (OpenCL)
ATI FirePro W8000 (OpenCL)
ATI FirePro S9000 (OpenCL)
ATI FirePro W9000 (OpenCL)
ATI FirePro S10000 (OpenCL)
Некоторые эффекты могут использовать вычислительные ресурсы сертифицированных видеокарт для ускорения рендеринга. Ускорение доступно только для эффекта, использующего ускорение графического процессора и только в том случае, если установлена поддерживаемая видеокарта. Если поддерживаемая видеокарта не установлена, то кнопка фильтра для таких эффектов по-прежнему будет доступна. Значок «Ускоренные эффекты» будет отображен в отключенном состоянии, что означает, что ускорение недоступно.
Теперь перейду к практике
Открываю программу Premier Pro. Появляется окно.
Откроется окно «Настройки проекта». И там Вы сможете выбрать средство рендеринга. Все очень просто.
На сколько эта функция будет эффективна зависит от Вашей видеокарты. Чем карта мощней тем лучший результат Вы получите.
Список команд в консоли, если у Вас Premiere Pro находится на диске «С»
C:\Windows\sustem32>cd..
C:\Windows>cd..
C:\>cd Program Files
C:\Program Files>cd Adobe
C:\Program Files\Adobe>cd Adobe Premiere Pro CC 2015
C:\Program Files\Adobe>cd Adobe Premiere Pro CC 2015>GPUSniffer.exe
Вообще то программа сама определяет подходит или нет видеокарта. Но попробовать можно.
Solved: This Effect requires GPU acceleration – (Improve Your Performance Now!)
Adobe’s Premiere Pro is arguably the most versatile editing tool available in the industry right now (sorry, Mac users). It allows you to edit your videos with the most excruciating of details and the finest of controls.
And with its ever-growing list of features, it’s become the primary software many people use to edit VR or 360° content.
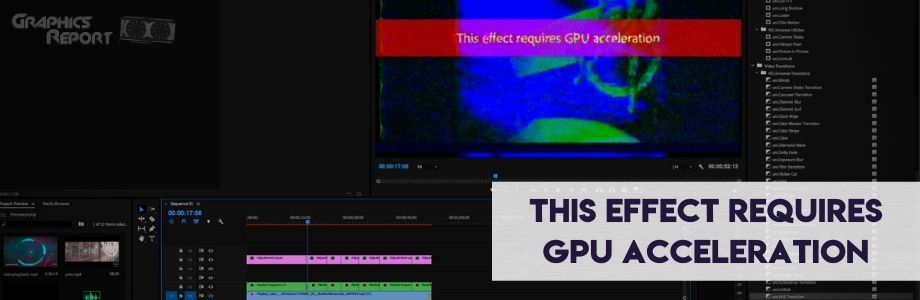
However, it’s not all roses and daisies out here because the software also often runs into weird bugs and issues, and possibly the most noted one out of all those is the infamous red banner on your screen saying, “This effect requires GPU acceleration.”
This happens when you are editing a video that requires your graphic card’s power to process everything thoroughly, but some obstacles can come in your way to prevent that from happening.
It can be as essential as enabling a toggle or as devastating as accepting the fact that you need to upgrade your graphics card.
How To Solve “This effect Requires GPU Acceleration” In Windows 10.
There are several different culprits behind this error; all of them can be solved, so need not worry. Let’s look at all the possible solutions to fixing the GPU acceleration error in Adobe Premiere Pro in Windows 10.
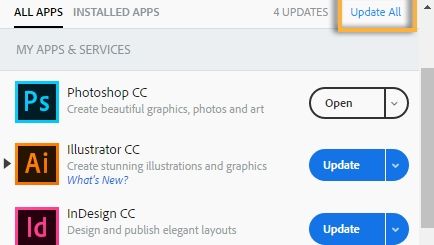
1- Install The Latest Updates.
It goes without saying, yet I am here saying it, please keep your stuff updated; this goes for everything from applications to even your drivers.
There is a reason developers release updates to their software regularly so that their app, in this case, Adobe Premiere Pro, strays away from any potential bugs or issues that can spoil your editing session.
Updating to the latest version of PP can potentially solve any previous problems or known issues that you were facing. Adobe updates its entire suite of applications pretty regularly to fix bugs and add new features, so make sure you’re running on the latest version of their editing software.
2- Make Sure That The Application Is Installed Correctly.
There is a good chance your installation of Premiere got corrupted, or maybe a fragment of the application is missing from the file directory. This is why you can also get the “Adobe Premiere couldn’t find any valid editing modes” message.
It can happen for various reasons, but to fix this, you have to re-download and then install it again, making sure that the application is installed 100 percent properly. Restart your PC and see if that did the job.
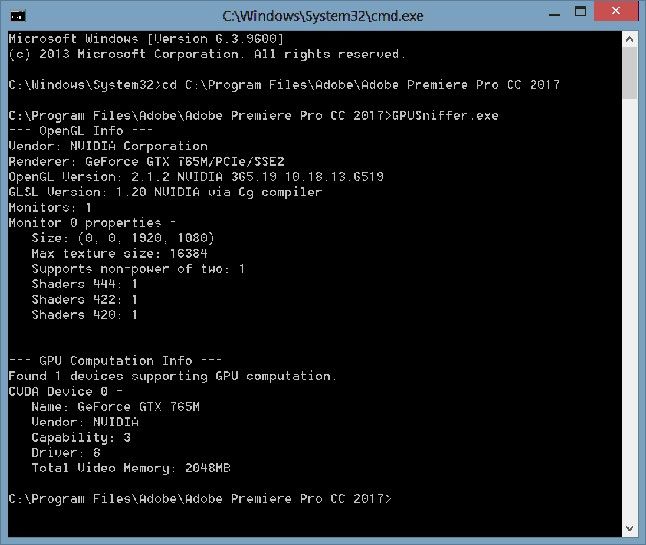
3- Run “GPUSniffer.exe.”
Adobe Premiere utilizes your CPU to run almost all the processes while your graphics card is given minimal work and acts instead as an assistant to your processor.
But that’s not the case all the time; often, the software needs to use your video card to lessen the burden from your processor or hand over tasks that are better suited for a graphics card to perform.
GPU acceleration is the name of this feature where applications call in your video card to work alongside your SoC. Still, sometimes PP fails even to recognize or detect your graphics card.
And here is where GPUSniffer.exe comes into its place to ‘sniff’ (hehe) out your video card from the system so that Premiere can use it for GPU accelerated tasks. To do this, close editing software Pro and,
If you are still seeing that red banner and it is not detecting your card, you need to upgrade your graphics drivers to the latest version (or roll back to a previous one if there are known compatibility issues in the new update).
Other than this, it will be good practice to disable your integrated graphics that are built into your CPU via either the BIOS or Device Manager.
This should do the trick and allow PP to pick up your graphics card and finally remove that frustrating red banner from your project. However, if it doesn’t and you are still where you started, then you need to follow along and try the steps mentioned above beforehand, too.
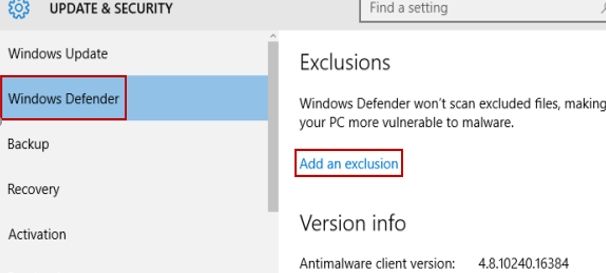
4- Check Your Antivirus.
You may have an antivirus installed on your computer to protect it from all sorts of evil and bad things, but do you know that the antivirus itself could be an evil dark lord?! Calm down. I’m just exaggerating.
Even though antiviruses have been known to cause issues and interfere with your system, they generally do a good job of guarding it, until you run into problems using other applications because of your antivirus.
Try disabling certain features or restrictions in your antivirus to allow for Premiere to run correctly. If the problem still pertains, then try disabling the antivirus entirely so that it does not interfere with the editing software at all.
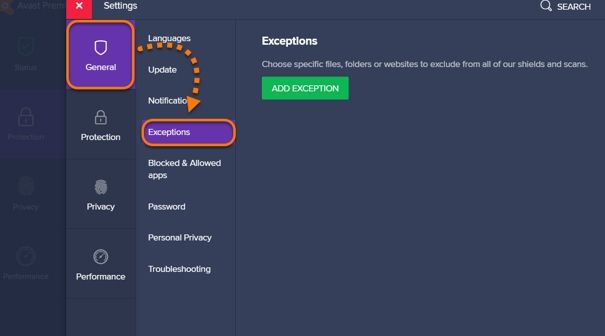
And don’t worry, disabling your antivirus won’t instantly hack your system; Windows Defender will do a good enough job of protecting your PC by itself. Still, I will suggest you also should white-list Adobe Premiere Pro from Windows Defender to stop any interference with the app.
5- Enable GPU Previewing [Mercury Engine]
Premiere Pro uses your processor to render and playback the video in real-time while you are editing it; this limits you to weaker software-based effects as serious or graphics-intensive effects will not work because your CPU has to do all the work here. However, PP can leverage your GPU to preview the video in real-time and essentially reduce the load of your CPU or enable more demanding effects to be pliable in real-time.
There are three different real-time rendering options available in Premiere, Software Only, CUDA, and OpenCL. You will notice that both CUDA and OpenCL are GPU accelerated options while the Software Only option exclusively utilizes your CPU to render everything making your graphics card sit duck. You want to select either of the GPU accelerated options based on your video card so you can be enabled to preview the most demanding effects in real-time.

How To Optimize Performance In Adobe Premiere Pro CC.
There are many ways to get more out of your system, case in point, for editing in Premiere. PP is known for being extremely demanding compared to other editing utilities, and for a good reason.
It offers the most multifaceted set of tools available in editing software (for Windows at least) and happens to include very comfortable integration with Adobe’s Creative Cloud.
So, let’s look at the ways you can make your experience using the editing software even better.
1- GPU Acceleration.
As we discussed above, you can push in your video card’s power to be wielded by the editing software for assisting in the preview or real-time rendering of your project.
This is called the way it is as you are “accelerating” your video card and harnessing its capabilities. You need at least a 1GB graphics card from either AMD or Nvidia to use this feature, the more recent, the better.
Nvidia is generally preferred in productivity based systems as Nvidia cards have “CUDA Cores” inside them that help massively in real-time rendering in editing software.
However, lately, AMD cards have been popping up everywhere because of their incredible price to performance ratio and the value proposition to budget-conscious consumers.
Refer to section 5 for more details on how to enable this feature in your project.
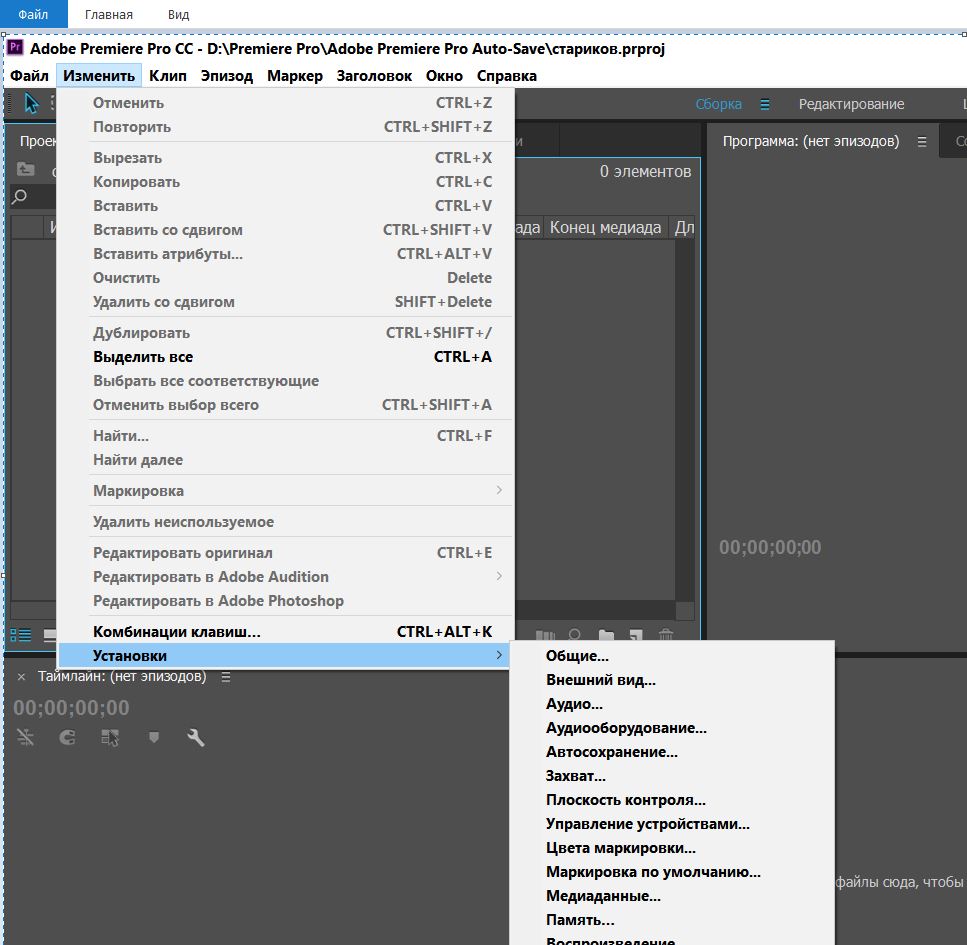
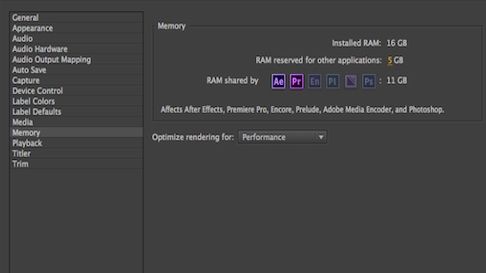
2- Memory Allocation.
RAM is certainly not a downloadable resource from the internet. You have a limited amount of it inside your system, so it’s good practice to allocate that RAM effectively between all your applications across your entire computer.
Adobe Premiere allows you to set a maximum amount of memory that it can use, shared with other Adobe apps like After Effects and Photoshop, etc.
You should set this number to as high as you can while reserving some RAM for other processes running on your computer, your browser, and maybe a media player, for example.
The general rule is to allocate about 75% of your RAM to Adobe Apps and leave the rest for your computer, but this is highly subjective and based upon your preferences and amount of memory present, of course.
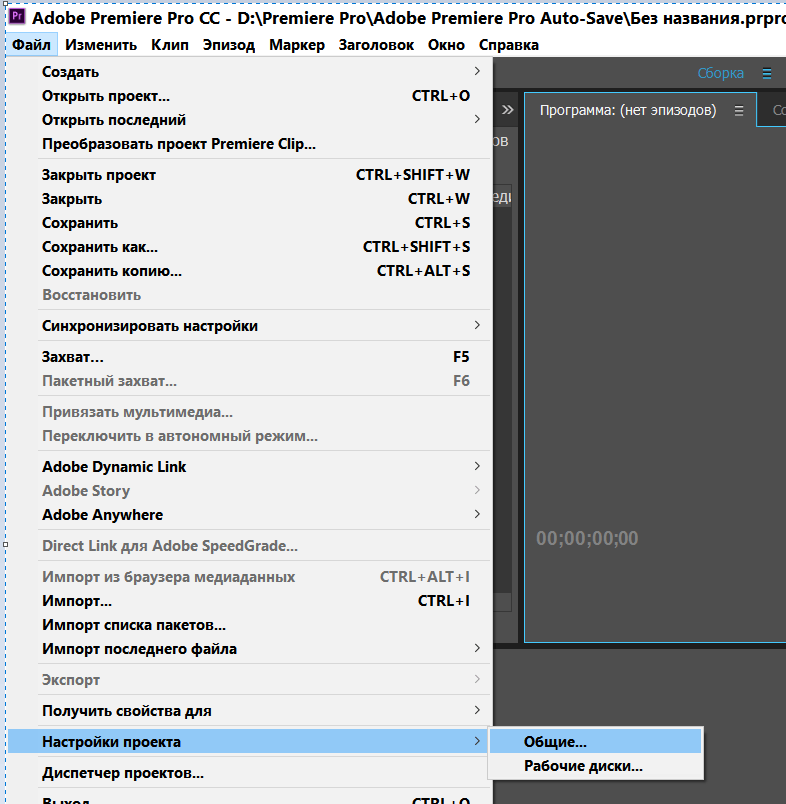
To change the allocated memory, select File, navigate to the Memory section, and adjust accordingly.
3- Optimizing Your System.
This is more of a starting step than anything else, as you should make sure that your system is capable of running Premiere Pro smoothly. Most importantly, it would help if you had a fast and capable CPU; I’d recommend at least a 6-core SoC.
Pair that with a graphics card capable of pushing all the frames it can; generally, the more expensive the video card, the better, and try to go with at least 4GB of VRAM (1 is the bare minimum).
Lastly, it would be best to have about 16GB of DDR4 memory for a smooth experience, even though you CAN work with 8. If you can squeeze in 32 gigs, you will be in a real sweet spot.
Keep in mind that SSDs are miles faster than mechanical hard drivers, so opt for one of those; there are many different types of SSDs, so do a little research before deciding.
Cooling is also something you need to give a thought to as you wouldn’t want your editing rig to heat up and start thermal throttling in the middle of an editing session. And like everything I mentioned above, the more you spend on it, the better parts you’ll get.
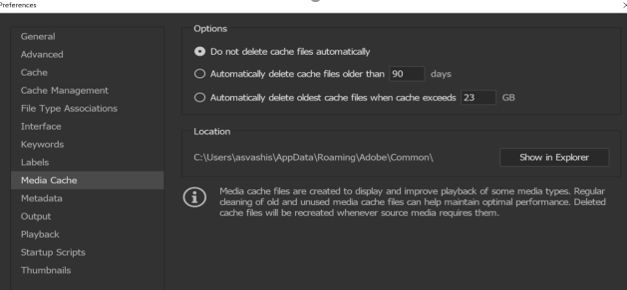
4- Point Media Cache To A Different Drive From OS.
Everyone knows that you install your OS on the fastest drive in your computer, but what about the rest of the stuff? Where does that go? See, Premiere creates cache files of all media that you import in so that it can access those files in a snap.
This can build up many files over time, and it’s going to become unhealthy for those cached files to be stored up inside your drive as it’s going to take up space and slow down your computer.
You want to leave your SSD (or wherever your OS is installed) to be utterly void of any other files so that your SSD can provide the best read/write speeds to your OS and keep everything real snappy. Media Cache files are going to slow that down.
To change this, go to File, navigate over to Media Cache, and set your Media Cache storage location to any drive other than where you have installed your OS to allow for optimal performance.
Final Verdict:
Professionals prefer and use Adobe’s suite of applications daily because they provide the best features available anywhere and allow creators to tailor the perfect video according to their taste. Sometimes, you hit small snags like a graphics acceleration error, but it is relatively easy to resolve this issue and contour your editing.
To get the most out of Adobe Premiere, you will need to follow a couple of straightforward guidelines that will ensure the best experience for you and allow you to make even better videos with the tools that are already readily available in the palm of your hands.
Frequently Asked Questions (FAQs)
1- How do I fix ‘this effect requires GPU acceleration’?
You need to make sure that the editing software is actually detecting your video card and then enable GPU Accelerated real-time preview rendering in the Premiere settings.
2- What does ‘this effect requires GPU acceleration mean’?
Your CPU is sometimes just not enough to handle all the processes that PP is throwing at it, so it needs your graphics card’s assistance, and that’s why you get this specific error.
3- How do I turn on this feature?
Go to File, then General, and under the “Video rendering and playback” settings, change the renderer to “Mercury Playback Engine GPU Accelerated (CUDA)” for Nvidia cards and “Mercury Playback Engine GPU Accelerated (OpenCL)” for AMD cards.
This effect requires gpu acceleration что делать premiere pro
Welcome to the Community!
We have a brand new look! Take a tour with us and explore the latest updates on Adobe Support Community.
Copy link to clipboard
If i add a few effects (10) in Premiere Pro the Message «Effect requires GPU Acceleration» appears in my Video. I have a AMD Radeon RX 5700XT and GPU Acceleration is active and works. What can i do? Premiere is latest Version and Radeon is also latest software Version.
![]()
![]()
Copy link to clipboard
![]()
Copy link to clipboard
How can you make AMD Radeon RX 5700XT and GPU Acceleration is active and works?
![]()
![]()
Copy link to clipboard
The message you are getting comes up also (from comments from engineers here) when there is insufficient vRAM available for operation at hand. If you have 10 effects applied to a clip, several of which use the GPU, you may simply be overloading too many GPU-intensive effects for processing at once.
So that is why the above comment suggested nesting. That breaks the processing into chunks as far as PrPro and the hardware are concerned, processing the stuff within the ‘nest’, then processing separately the stuff outside the nest.
And something I see fairly often here, is people that will apply say video noise reduction, Warp stabilizer, and 2-4 instances of Lumetri to a clip. And then, they speed-ramped it all.
That will knock out any heavy iron, let alone the rigs most people actually work on.
So for that kind of work, I suggest as do many: apply the noise reduction (typically Neat) or the Warp stabilizer. Do a render/replace to a full «digital intermediate» codec like Cineform, DNxHD/R, or ProRes 422. Then do the next step or two, then nest the clip, then the last one.
Ten effects applied at once may simply be way above and beyond reasonable expectations.
Рендеринг с ускорением графического процессора и аппаратное кодирование/декодирование
В этой статье говорится об Adobe Insight (с ускорением графического процессора) и аппаратном декодировании/кодировании (Intel® Quick Sync) в Adobe Premiere Pro и Adobe Media Encoder.
Adobe Premiere Pro и Adobe Media Encoder могут использовать имеющиеся в вашей системе графические процессоры для распределения нагрузки между ЦП и ГП для повышения производительности. В настоящее время большая часть обработки выполняется центральным процессором, а графический процессор помогает в обработке определенных задач и функций.
Модуль рендеринга Mercury Playback Engine (с ускорением графического процессора) используется для рендеринга эффектов и функций с ускорением графического процессора.
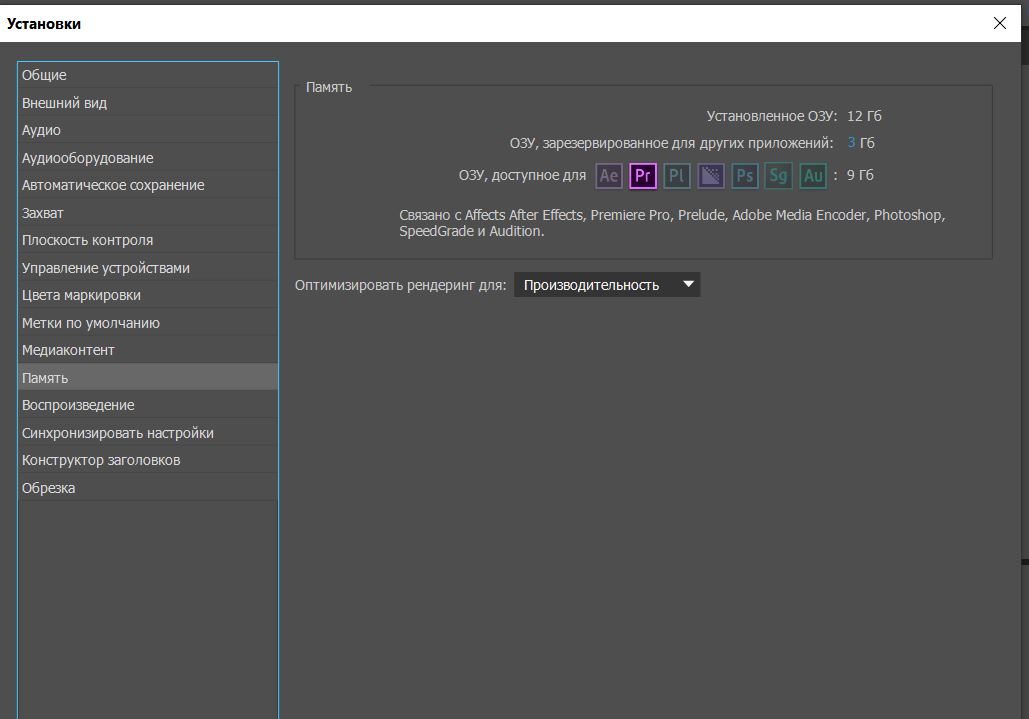
Здесь представлен список эффектов с ускорением графического процессора в Adobe Premiere Pro. Чтобы найти эффекты с ускорением графического процессора, перейдите на панель Эффекты и найдите значок «Ускоренные эффекты».
Значок эффектов с ускорением графического процессора
Помимо обработки этих эффектов, Mercury Playback Engine (с ускорением графического процессора) используется для обработки изображений, изменения размеров, преобразования цветового пространства, изменения цвета и многого другого. Он также используется для воспроизведения и очистки временной шкалы и полноэкранного воспроизведения с использованием Mercury Transmit.
Здесь представлен список рекомендуемых графических карт для Adobe Premiere Pro.
Рекомендуется использовать графические процессоры с 4 ГБ видеопамяти, но объем памяти может варьироваться в зависимости от типа работы, выполняемой в Adobe Premiere Pro.
Общие требования к объему видеопамяти:
Для ВР необходим объем видеопамяти не менее 6 ГБ. При работе со стереоскопическими кадрами с более высоким разрешением (например, 8K x 8K), вам может понадобиться больший объем видеопамяти. При использовании графических процессоров NVIDIA убедитесь в том, что установлена последняя версия драйвера, поддерживающая CUDA 9.2.
Важно помнить о том, что покупка более старой видеокарты означает, что поддержка драйверов закончится раньше, чем для новой карты.

Установка модуля рендеринга в Adobe Premiere Pro

Установка модуля рендеринга в Adobe Media Encoder
В Adobe Media Encoder Модуль рендеринга также можно установить в правом нижнем углу панели Очередь.
Если параметр Mercury Playback Engine GPU Acceleration недоступен после обновления или переустановки Adobe Premiere Pro, выполните чистую установку драйверов графического процессора для решения этой проблемы.
Adobe Premiere Pro использует один графический процессор во время воспроизведения и нескольких графических процессоров для выполнения других задач, таких как Рендеринг точки входа и выхода и экспорт. Можно настроить CrossFire для представления нескольких графических процессоров в качестве одного логического ГП, и в этом случае Adobe Premiere Pro рассматривает его как один графический процессор.
В случае использования конфигурации с несколькими графическими процессорами (отличной от SLI или CrossFire) рекомендуется отключить функцию автоматического переключения графического процессора или графики на основе системы или драйвера.
Модуль Mercury Playback Engine, работающий на выделенном графическом процессоре, не используется для обработки всего, что связано с графическим процессором. Встроенный графический процессор может использоваться для определенных задач, таких как кодирование и декодирование определенных кодеков и действия пользовательского интерфейса, которые могут отображаться при отслеживании использования графического процессора.
Использование графического процессора зависит от нескольких факторов. Использование графического процессора при редактировании или рендеринге может быть максимальным в зависимости от количества используемых эффектов или функций с ускорением графического процессора и его вычислительных возможностей. Таким образом, мощный графический процессор, такой как NVIDIA RTX 2080, может работать быстрее, чем NVIDIA GTX 1060, но при этом показывать менее интенсивное использование. Это происходит потому, что он более мощный и ему может потребоваться меньше аппаратных ресурсов для обработки той же информации, что и NVIDIA GTX 1060 или другим графическим процессорам среднего класса. При использовании нескольких эффектов с ускорением графического процессора интенсивность его работы может сначала быть низкой, но затем увеличиться при использовании большего количества эффектов с ускорением графического процессора.
Это относится только к эффектам VR. Это сообщение появляется, когда у графического процессора недостаточно видеопамяти для обработки эффекта.
Кодирование с аппаратным ускорением
Intel® Quick Sync — это технология Intel®, которая использует специальные возможности обработки мультимедиа Intel® Graphics Technology для быстрого декодирования и кодирования, позволяя процессору выполнять другие задачи и повышать производительность. В настоящее время поддерживается только кодирование с помощью кодеков h.264 и HEVC (h.265). Эта функция доступна только в том случае, если используется процессор Intel® с поддержкой Intel® Quick Sync.
Здесь представлены системные требования для кодирования с аппаратным ускорением.
Включение и отключение аппаратного кодирования зависит от типа используемого процессора Intel®. Если поддерживаемый процессор не используется или технология Intel® Quick Sync отключена в BIOS, этот параметр может быть недоступен.
Чтобы его включить, выберите H.264/ HEVC из раскрывающегося списка форматов в разделе Настройки экспорта. Затем на вкладке Видео перейдите в Настройки кодирования и установите для параметра Производительность значение Аппаратное кодирование. При выборе Программного кодирования отключится аппаратное кодирование и Adobe Premiere Pro не будет использовать Intel® Quick Sync для кодирования медиафайлов (это может увеличить время рендеринга).

Включить аппаратное кодирование
При использовании аппаратного кодирования графический процессор может интенсивнее работать на встроенном процессоре Intel®, а не на выделенном ГП.
Поддерживаемые платформы кодеков
Кодирование: H.264/AVC, HEVC 4:2:0 до 4096×4096. Начиная с 10-го поколения процессоров Intel® Core™ и более поздних, кодирование HEVC поддерживается до 8192×8192.
Декодирование: H.264/AVC, HEVC 4:2:0 до 4096×4096 (часть содержимого 8K HEVC работает на процессорах Intel® Core™ 7-го поколения и более поздних)
Чтобы эта функция работала, требуется процессор Intel® с поддержкой Intel® Quick Sync. Проверьте, отвечает ли процессор Intel® требованиям для аппаратного кодирования. Если BIOS вашей системы поддерживает включение и отключение графического процессора Intel®, убедитесь, что он всегда включен, чтобы аппаратное кодирование работало. Некоторые системы, такие как Surface Studio, могут не включать графический процессор Intel®, что может привести к тому, что параметр аппаратного кодирования будет недоступен.
При наличии поддерживаемого ЦП Intel® с включенным ГП Intel® и невозможности использования аппаратного кодирования убедитесь, что ГП Intel® указан на вкладке диспетчера задач «Производительность» (только для Windows®). Если графический процессор Intel® отсутствует в списке, проверьте, включен ли он в диспетчере устройств, и обновите графические драйверы Intel® до последней версии.

Графический процессор Intel® указан в диспетчере задач и диспетчере устройств