warning your dimm1 and dimm2 moduleorganization is not same please check it что делать

Добавление оперативной памяти в ноутбук: совместимость, примеры, практика. Большой фактчекинг

Мао Цзедун когда-то говорил «Пусть расцветают сто цветов, пусть растёт объем оперативной памяти». Возможно, мы что-то напутали со второй частью, но полностью c ней согласны

Вряд ли китайский революционер подозревал, насколько сильно скакнёт развитие технологий в следующие 50 лет. Правда, такой быстрый прогресс доступен далеко не для всех — цены растут так же быстро, как и количество транзисторов на кристаллах процессоров. Дешевле проапгрейдить текущее железно, нежели выкладывать круглую сумму за новый ноутбук. Первый трай — он трудный самый.

Совместимость модулей ОЗУ (текущей и планируемой)

В ноутбуках используется оперативная память форм-фактора SO-DIMM. Совместимость модулей оперативной памяти зависит, в том числе, от тактико-технических характеристик материнской платы и процессора. Какой тип памяти она поддерживает? Как работает контроллер памяти в CPU? Окей, как минимум одна плашка оперативки у нас в ноутбуке так или иначе* присутствует и можно ориентироваться на неё.

* — на некоторых моделях ноутбуков (например, внешне симпатичный Asus X540S) оперативная память распаяна на материнской плате. Буквально — она не съемная. Поэтому в таких ноутбуках ни о каком апгрейде речь, конечно, не идёт. Не рекомендуем к покупке такие экземпляры, если планируется тюнинг железа.

Итак, что мы имеем. В нашем случае стоял модуль Kingston 2gb 1rx16 pc3l-12800s-11-11-c3.

warning your dimm1 and dimm2 moduleorganization is not same please check it что делать. Смотреть фото warning your dimm1 and dimm2 moduleorganization is not same please check it что делать. Смотреть картинку warning your dimm1 and dimm2 moduleorganization is not same please check it что делать. Картинка про warning your dimm1 and dimm2 moduleorganization is not same please check it что делать. Фото warning your dimm1 and dimm2 moduleorganization is not same please check it что делать

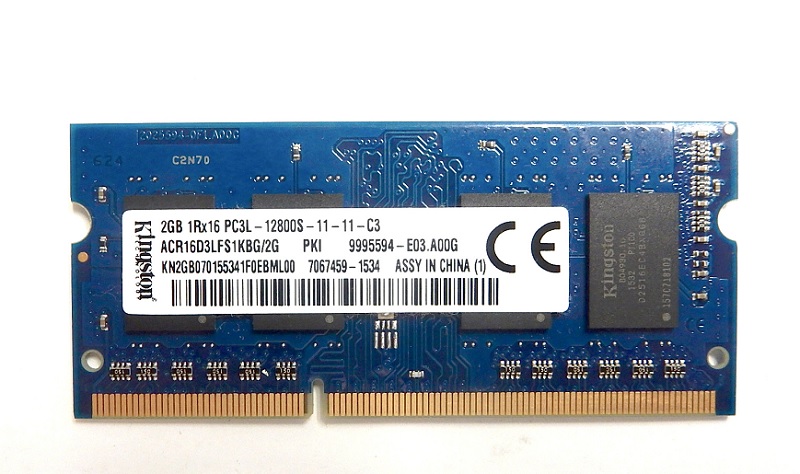
Что значат все эти параметры? Начнем с самого начала:

1Rx16

PC3L

Параметр напряжения питания. PC3L использует пониженное рабочее напряжение (1.35 В), в то время как «обычный» PC3 работает на 1,5В. Здесь нюанс в том, что PC3L может спокойно работать на «стандартном» напряжении в 1,5В, в то время как PC3 на пониженном (1,35В) уже не заведётся. В целом PC3 (DDR3) и PC3L (DDR3L) могут поладить друг с другом, но лучше не рисковать и искать одинаковые планки, иначе возможны не иллюзорные проблемы в виде самопроизвольной перезагрузки

12800S

Тут нужно уточнение. Эффективная частота — это та, которая указано на маркировке модуля. Т.е. это максимальная частота, на которой может работать эта оперативная память, но это не гарантируется, хоть и указано в спецификации. Реальная частота — та, на которой действительно будет работать ваша оперативная память (более подробно в следующем разделе)

В совокупности с предыдущим параметром (PC3L) мы понимаем, что наш типа памяти DDR3L SODIMM (посмотреть список частот и определить свой тип памяти можно здесь). Но DDR3 (DDR3L) может быть и с другими параметрами: 800Мгц (PC3-6400) или 1866Мгц (PC3-14900). Это нужно учитывать при покупке. Ну и совсем очевидный совет: если у вас стоит DDR3-модуль, то и второй должен быть аналогичный (не DDR2 и не DDR4)

11-11-c3

Последние параметры многие ошибочно принимают за тайминги. Это не совсем так. Только первое число в данном случае — тайминг. Давайте по порядку:

Как узнать, какая у меня оперативная память установлена в данный момент?

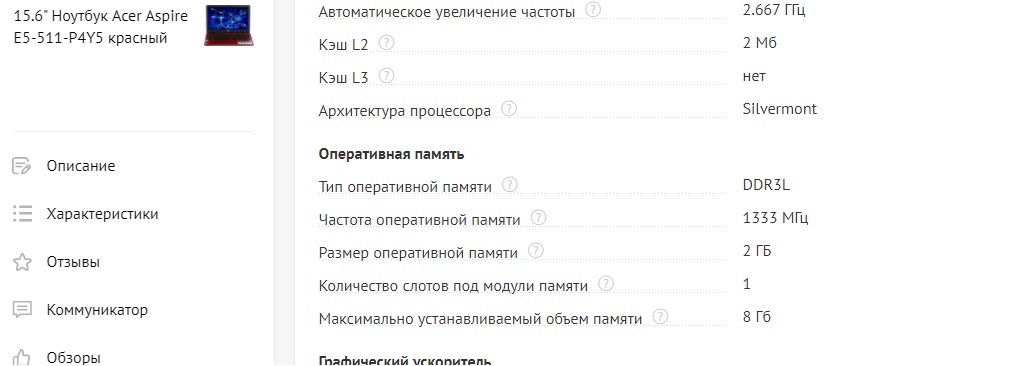
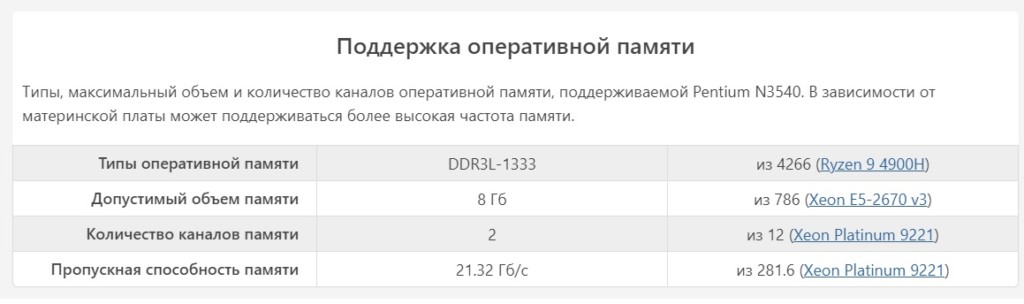
Вскрывать для этого ноутбук не нужно. Во-первых, можно нагуглить по модели ноутбука. В спеках всегда указывается какой тип памяти поддерживается контроллером памяти. Правда, даже в цифровых магазинах данные не всегда совпадают. Например, модель Acer Aspire E5-511-P4Y5. На сайте одной из известных сетей по продаже электроники указано, что слот под память у них один. На самом деле в модели два слота под ОЗУ. Но тип памяти указан верно — DDRL3

warning your dimm1 and dimm2 moduleorganization is not same please check it что делать. Смотреть фото warning your dimm1 and dimm2 moduleorganization is not same please check it что делать. Смотреть картинку warning your dimm1 and dimm2 moduleorganization is not same please check it что делать. Картинка про warning your dimm1 and dimm2 moduleorganization is not same please check it что делать. Фото warning your dimm1 and dimm2 moduleorganization is not same please check it что делать

Второй вариант — более практичный и точный. Использовать утилиту CPU-Z. Она покажет тип памяти и частоту, с которой запустилась оперативная память (она не всегда стартует с паспортной частотой). Нас интересуют две вкладки — SPD и Memory

warning your dimm1 and dimm2 moduleorganization is not same please check it что делать. Смотреть фото warning your dimm1 and dimm2 moduleorganization is not same please check it что делать. Смотреть картинку warning your dimm1 and dimm2 moduleorganization is not same please check it что делать. Картинка про warning your dimm1 and dimm2 moduleorganization is not same please check it что делать. Фото warning your dimm1 and dimm2 moduleorganization is not same please check it что делать

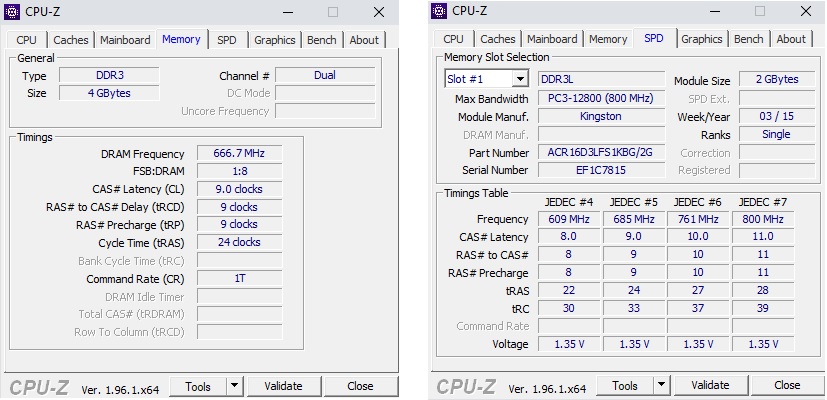
Тоже самое касается и вкладки SPD. Что это вообще такое? SPD (Serial Presence Detect) — это специальный чип, в котором зашиты данные о производители и о рекомендуемых параметрах работы этого модуля памяти. В Max Bandwidth указан максимальный стандартный по JEDEC режим. Там у нас указано 800 Mhz (что равно эффективной частоте 1600Mhz) — для данного модуля памяти это потолок.

Примеры совместимости

Память DDR4 PC4-19200 2400МГц (тайминги 16-16-16-36)

Память DDR4 PC4-21300 2666МГц (19-19-19)

Память DDR3 PC3-10600 1333МГц

Память DDR3 PC3-12800 1600МГц

Какой тип памяти поддерживает мой ноутбук?

warning your dimm1 and dimm2 moduleorganization is not same please check it что делать. Смотреть фото warning your dimm1 and dimm2 moduleorganization is not same please check it что делать. Смотреть картинку warning your dimm1 and dimm2 moduleorganization is not same please check it что делать. Картинка про warning your dimm1 and dimm2 moduleorganization is not same please check it что делать. Фото warning your dimm1 and dimm2 moduleorganization is not same please check it что делать

Как лучше его набрать: одной планкой или двумя?

Разбор ноутбука для добавления/замены планки ОЗУ

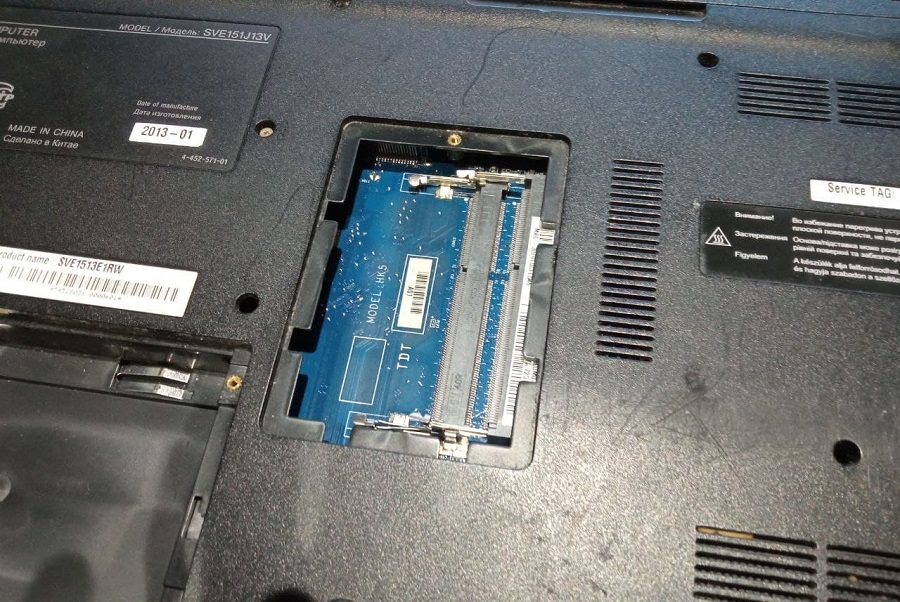
Добавление планки оперативной памяти мы будем осуществлять на примере ноутбука Acer Aspire E5-511-P4Y5. Его проблема в том, что у него нет быстрого доступа к оперативной памяти через заднюю крышку, как, например, у Sony Vaio:

warning your dimm1 and dimm2 moduleorganization is not same please check it что делать. Смотреть фото warning your dimm1 and dimm2 moduleorganization is not same please check it что делать. Смотреть картинку warning your dimm1 and dimm2 moduleorganization is not same please check it что делать. Картинка про warning your dimm1 and dimm2 moduleorganization is not same please check it что делать. Фото warning your dimm1 and dimm2 moduleorganization is not same please check it что делать

Если вам так же не повезло, то придётся разбирать ноутбук. Процесс, в принципе, одинаковый для всех ноутбуков — откручиваем болты на крышке, отщелкиваем её, отключаем шлейфы и материнская плата перед нами. Для начала отключаем батарею. Здесь это реализовано с помощью специальной задвижки.

warning your dimm1 and dimm2 moduleorganization is not same please check it что делать. Смотреть фото warning your dimm1 and dimm2 moduleorganization is not same please check it что делать. Смотреть картинку warning your dimm1 and dimm2 moduleorganization is not same please check it что делать. Картинка про warning your dimm1 and dimm2 moduleorganization is not same please check it что делать. Фото warning your dimm1 and dimm2 moduleorganization is not same please check it что делать

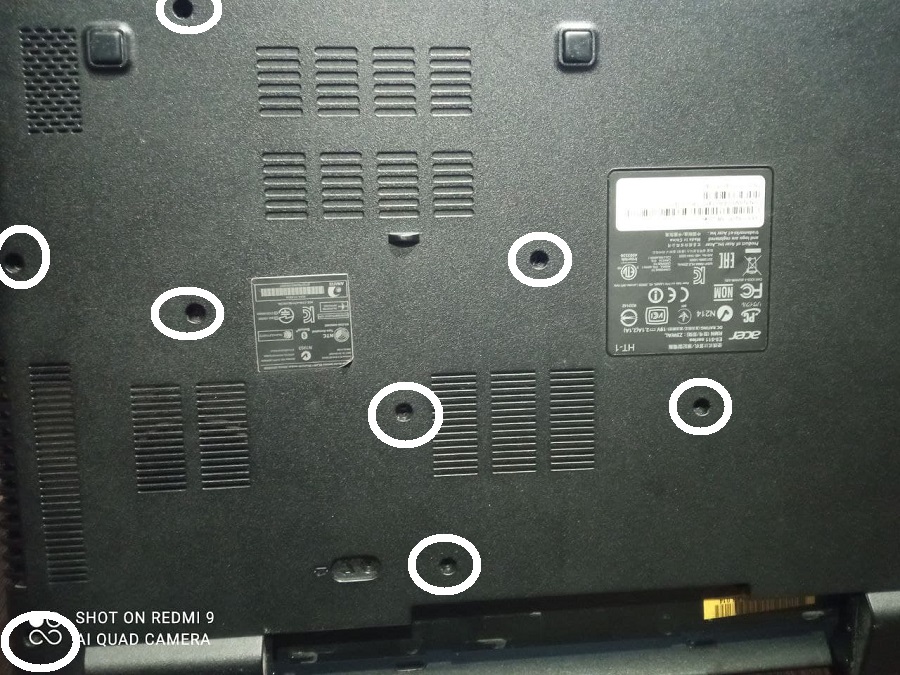
Дальше откручиваем все винты с задней крышки. Как мы уже писали выше, на этом ноутбуке нет технологических съемных панелей для быстрого извлечения жёсткого диска или оперативной памяти. Поэтому придется откручивать всё:

warning your dimm1 and dimm2 moduleorganization is not same please check it что делать. Смотреть фото warning your dimm1 and dimm2 moduleorganization is not same please check it что делать. Смотреть картинку warning your dimm1 and dimm2 moduleorganization is not same please check it что делать. Картинка про warning your dimm1 and dimm2 moduleorganization is not same please check it что делать. Фото warning your dimm1 and dimm2 moduleorganization is not same please check it что делать

Будьте аккуратны с петлями ноутбука. Почти на всех моделях (вне зависимости от производителя) они крепятся винтами к пластиковым деталям на корпусе, которые вырывает с корнем просто на ура, особенно, когда на них не давит крышка ноутбука.

Далее нужно отсоединить крышку от корпуса. Здесь аккуратней, сильно не усердствуйте — защелки имеют свойство ломаться

warning your dimm1 and dimm2 moduleorganization is not same please check it что делать. Смотреть фото warning your dimm1 and dimm2 moduleorganization is not same please check it что делать. Смотреть картинку warning your dimm1 and dimm2 moduleorganization is not same please check it что делать. Картинка про warning your dimm1 and dimm2 moduleorganization is not same please check it что делать. Фото warning your dimm1 and dimm2 moduleorganization is not same please check it что делать

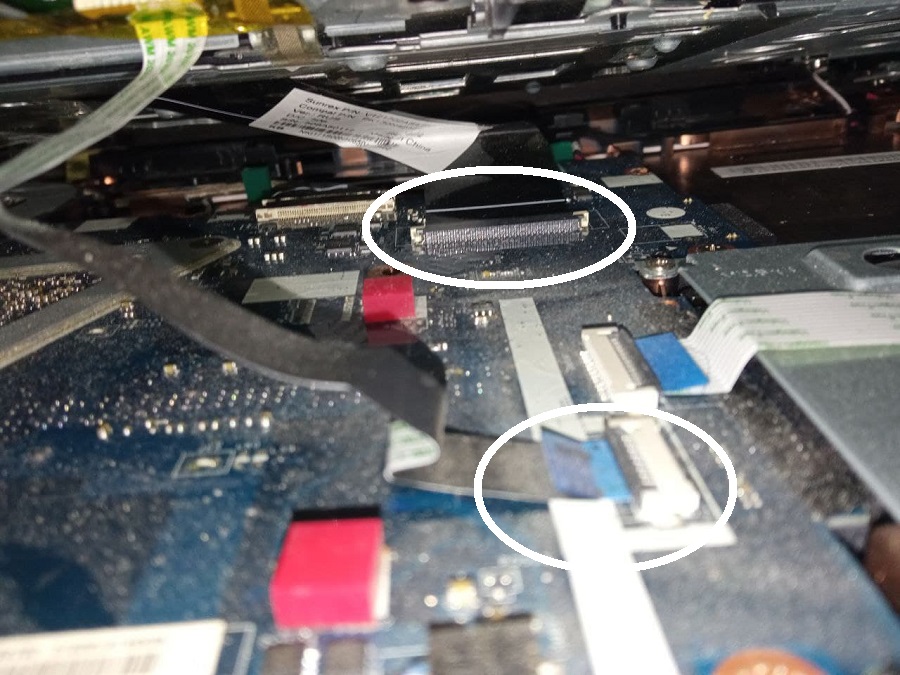
Не забываем, что крышку нельзя резко поднимать — нужно отключить шлейфы. У нас это шлейф тачпада и клавиатуры

warning your dimm1 and dimm2 moduleorganization is not same please check it что делать. Смотреть фото warning your dimm1 and dimm2 moduleorganization is not same please check it что делать. Смотреть картинку warning your dimm1 and dimm2 moduleorganization is not same please check it что делать. Картинка про warning your dimm1 and dimm2 moduleorganization is not same please check it что делать. Фото warning your dimm1 and dimm2 moduleorganization is not same please check it что делать

Здесь еще немного геморроя. Дело в том, что оперативная память крепится на обратной стороне материнки. Придётся снимать и её. Откручиваем винты и снимаем оставшиеся шлейфы. Да, жесткий диск тоже придется отсоединять — он будет мешать вынуть материнскую плату из корпуса

warning your dimm1 and dimm2 moduleorganization is not same please check it что делать. Смотреть фото warning your dimm1 and dimm2 moduleorganization is not same please check it что делать. Смотреть картинку warning your dimm1 and dimm2 moduleorganization is not same please check it что делать. Картинка про warning your dimm1 and dimm2 moduleorganization is not same please check it что делать. Фото warning your dimm1 and dimm2 moduleorganization is not same please check it что делать

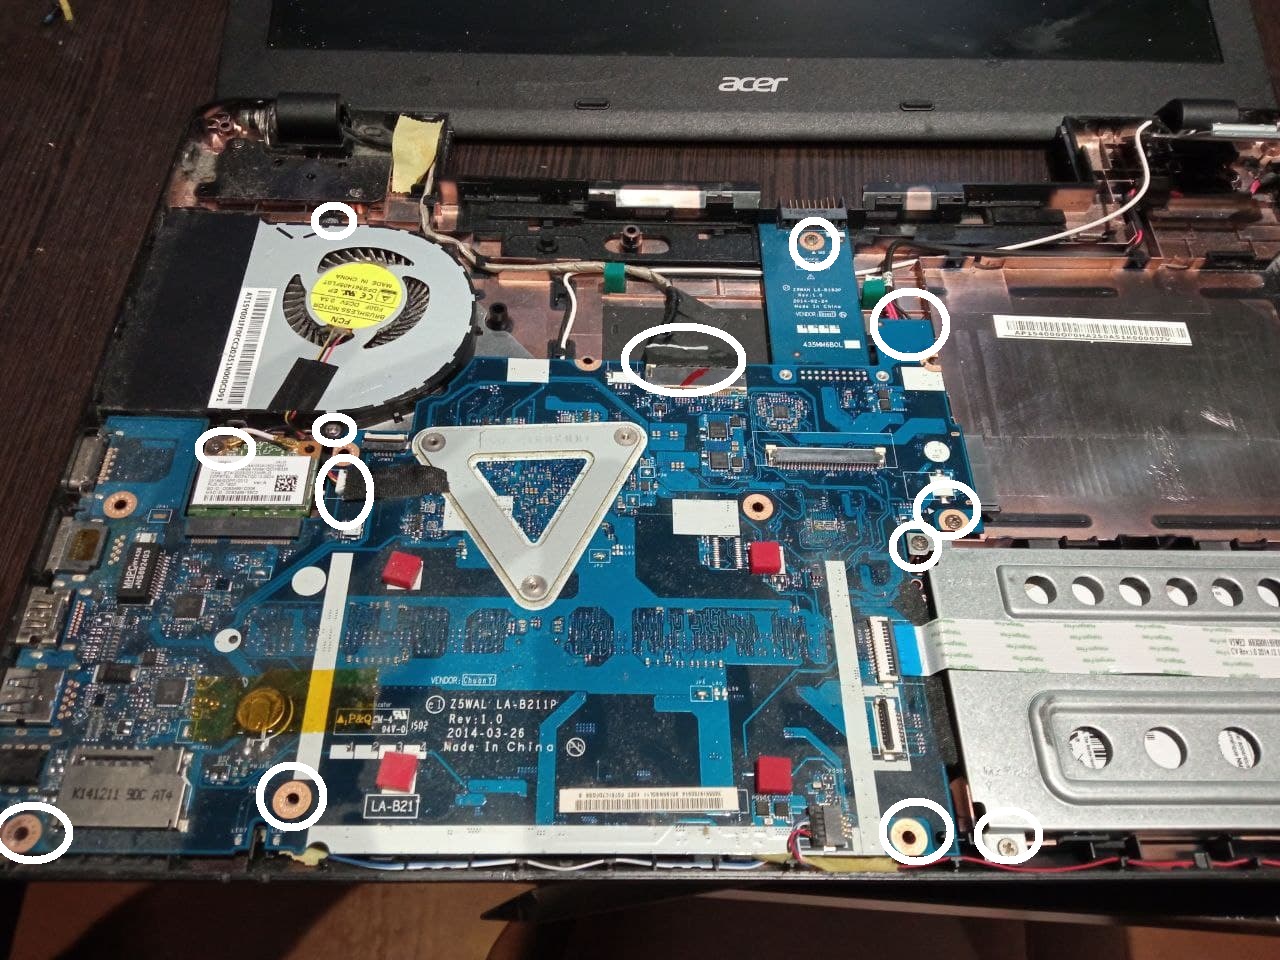
Переворачиваем материнскую плату и видим свободный слот.

warning your dimm1 and dimm2 moduleorganization is not same please check it что делать. Смотреть фото warning your dimm1 and dimm2 moduleorganization is not same please check it что делать. Смотреть картинку warning your dimm1 and dimm2 moduleorganization is not same please check it что делать. Картинка про warning your dimm1 and dimm2 moduleorganization is not same please check it что делать. Фото warning your dimm1 and dimm2 moduleorganization is not same please check it что делать

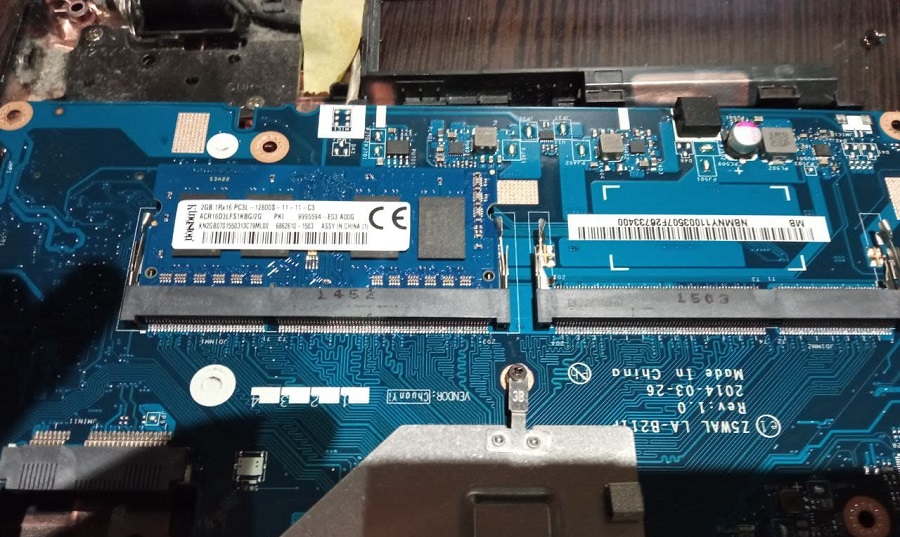
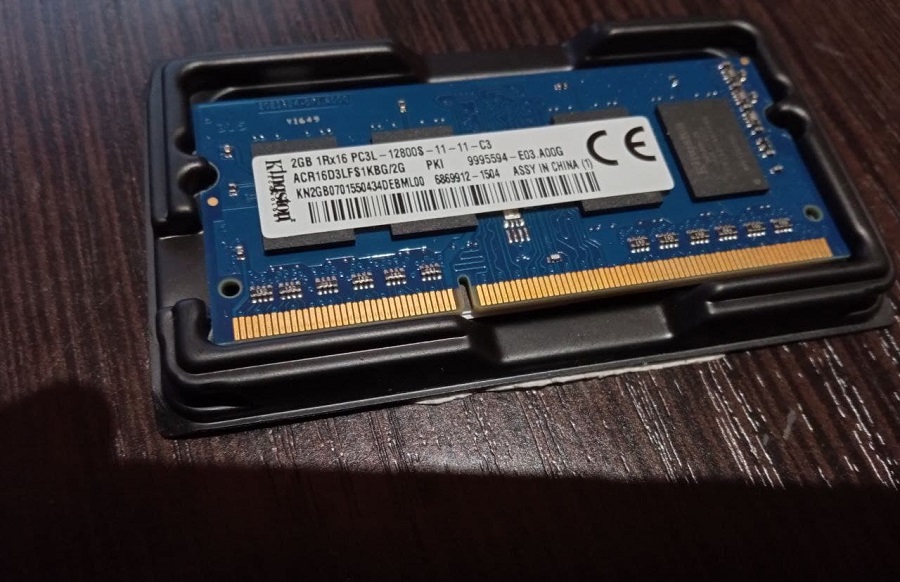
Первый модуль материнской платы у нас Kingston 2gb 1rx16 pc3l-12800s-11-11-c3. У нас есть еще один модуль, но с совершенно другими параметрами 2rx8-PC3-11-11-F3

warning your dimm1 and dimm2 moduleorganization is not same please check it что делать. Смотреть фото warning your dimm1 and dimm2 moduleorganization is not same please check it что делать. Смотреть картинку warning your dimm1 and dimm2 moduleorganization is not same please check it что делать. Картинка про warning your dimm1 and dimm2 moduleorganization is not same please check it что делать. Фото warning your dimm1 and dimm2 moduleorganization is not same please check it что делать

warning your dimm1 and dimm2 moduleorganization is not same please check it что делать. Смотреть фото warning your dimm1 and dimm2 moduleorganization is not same please check it что делать. Смотреть картинку warning your dimm1 and dimm2 moduleorganization is not same please check it что делать. Картинка про warning your dimm1 and dimm2 moduleorganization is not same please check it что делать. Фото warning your dimm1 and dimm2 moduleorganization is not same please check it что делать

Именно поэтому мы приобрели на Авито аналогичный модуль, который был успешно интегрирован (спасибо продавцу)

warning your dimm1 and dimm2 moduleorganization is not same please check it что делать. Смотреть фото warning your dimm1 and dimm2 moduleorganization is not same please check it что делать. Смотреть картинку warning your dimm1 and dimm2 moduleorganization is not same please check it что делать. Картинка про warning your dimm1 and dimm2 moduleorganization is not same please check it что делать. Фото warning your dimm1 and dimm2 moduleorganization is not same please check it что делать

После установки памяти ноутбук уходит в BSOD, зависает и т.п.

Если в итоге ноутбук запустился, то это не означает, что всё в порядке. Проблемы могут возникнуть уже в процессе эксплуатации:

Траблшутинг здесь довольно ограничен, но кое-что попробовать можно:

Источник

Проблема с DDR при включении

Доброго дня. Раздел про биос не нашла. Не кидайте тапками.

Есть старенький комп, хочу из него сервер домашний сделать.

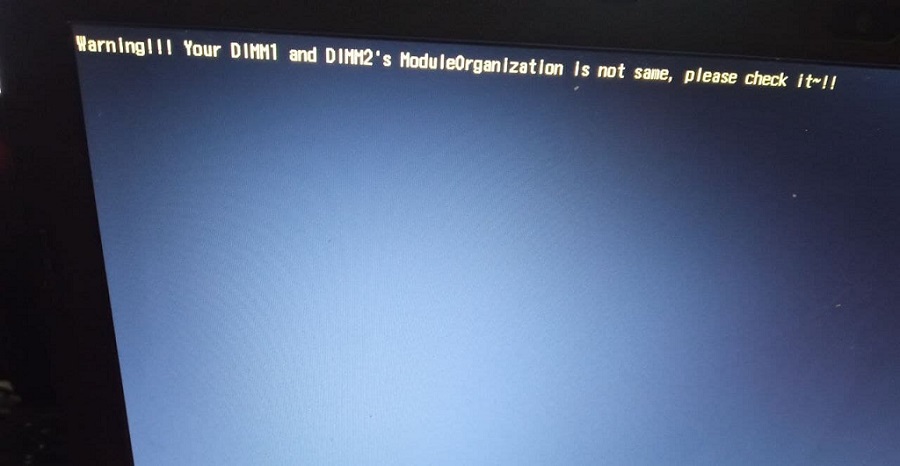
При загрузке выдает следующую инфу:

В биосе, на главном экране:

Как режим памяти сменить, если это возможно?

warning your dimm1 and dimm2 moduleorganization is not same please check it что делать. Смотреть фото warning your dimm1 and dimm2 moduleorganization is not same please check it что делать. Смотреть картинку warning your dimm1 and dimm2 moduleorganization is not same please check it что делать. Картинка про warning your dimm1 and dimm2 moduleorganization is not same please check it что делать. Фото warning your dimm1 and dimm2 moduleorganization is not same please check it что делать

warning your dimm1 and dimm2 moduleorganization is not same please check it что делать. Смотреть фото warning your dimm1 and dimm2 moduleorganization is not same please check it что делать. Смотреть картинку warning your dimm1 and dimm2 moduleorganization is not same please check it что делать. Картинка про warning your dimm1 and dimm2 moduleorganization is not same please check it что делать. Фото warning your dimm1 and dimm2 moduleorganization is not same please check it что делать

warning your dimm1 and dimm2 moduleorganization is not same please check it что делать. Смотреть фото warning your dimm1 and dimm2 moduleorganization is not same please check it что делать. Смотреть картинку warning your dimm1 and dimm2 moduleorganization is not same please check it что делать. Картинка про warning your dimm1 and dimm2 moduleorganization is not same please check it что делать. Фото warning your dimm1 and dimm2 moduleorganization is not same please check it что делать

Есть старенький комп, хочу из него сервер домашний сделать.
При загрузке выдает следующую инфу.

Подключила найденные в закромах родины планки памяти.

warning your dimm1 and dimm2 moduleorganization is not same please check it что делать. Смотреть фото warning your dimm1 and dimm2 moduleorganization is not same please check it что делать. Смотреть картинку warning your dimm1 and dimm2 moduleorganization is not same please check it что делать. Картинка про warning your dimm1 and dimm2 moduleorganization is not same please check it что делать. Фото warning your dimm1 and dimm2 moduleorganization is not same please check it что делать

надо одну отключить.
которая самая маленькая

warning your dimm1 and dimm2 moduleorganization is not same please check it что делать. Смотреть фото warning your dimm1 and dimm2 moduleorganization is not same please check it что делать. Смотреть картинку warning your dimm1 and dimm2 moduleorganization is not same please check it что делать. Картинка про warning your dimm1 and dimm2 moduleorganization is not same please check it что делать. Фото warning your dimm1 and dimm2 moduleorganization is not same please check it что делать

Dual-channel opertion requires identical paired DIMMs installed across both memory channels.

Тут все написано. Двухканальный режим хочет две одинаковые планки в соответсвующих слотах.

Memory Channel A Slot 0 256 MB (DDR400)
Memory Channel A Slot 1 256 MB (DDR266)
Memory Channel B Slot 0 128 MB (DDR266)
Memory Channel B Slot 1 Not Installed

Можешь сделать 512MB в двухканальном режиме. Будет работать на скорости DDR266.

warning your dimm1 and dimm2 moduleorganization is not same please check it что делать. Смотреть фото warning your dimm1 and dimm2 moduleorganization is not same please check it что делать. Смотреть картинку warning your dimm1 and dimm2 moduleorganization is not same please check it что делать. Картинка про warning your dimm1 and dimm2 moduleorganization is not same please check it что делать. Фото warning your dimm1 and dimm2 moduleorganization is not same please check it что делать

Должны быть идентичные планки тобишь либо 4*256мб либо 2*256 по другому увы, разница между single и dual channel не сильно то и велика

Источник

Asus M2npv не работает один из каналов памяти

А что за проц? контроллер памяти же в проце находиться.

Кстати, ты хорошо продул/прочистил вторые слоты для памяти? одной правильной пылинки вполне достаточно для блокировки контакта.

AMD Athlon 64 X2 3800+

Кстати, ты хорошо продул/прочистил вторые слоты для памяти?

Т.е. это получается, что вся вставленная память видна только тогда (двухканальность пока не трогаем), когда вставлены три планки не важно в какой слот. Правильно?

А стоит ли? Если я его перепрошил на новый и результата никакого?

А биос последний 0603 поставил?

Ну напруга может быть. Но ECC ко мне отношения не имеет. В любом случае БИОС ничего не дал.
Я вот что подумал, там в мануале странная фраза написана. Может я ее неправильно перевожу, либо она противоречит сама себе. Цитирую:

For dual-channel configuration, the total size of memory module(s) installed per channel must be the same(DIMM_A1+DIMM_A2 = DIMM_B1+DIMM_B2).

Ну напруга может быть. Но ECC ко мне отношения не имеет.

For dual-channel configuration, the total size of memory module(s) installed per channel must be the same(DIMM_A1+DIMM_A2 = DIMM_B1+DIMM_B2).

Кстати, попробуй и ее.

.. Память видна именно в такой конфигурации. Когда в двух желтых по 512, а в одном черном 1024.

Supports 3 modules inserted into both the blue and black slots as two pairs of
Dual-channel memory configuration.

Поддерживает 3 модуля, вставленных в оба синих и черный слоты как две пары двухканальной конфигурации памяти.

Возможно, это действительно некая несовместимость встроенного контроллера памяти процессора и модулей памяти. Если внимательно изучить три таблицы с протестированными модулями, можно видеть, что вариант «С» (установка более одной пары модулей) для двусторонних модулей возможен только для памяти crucial и Hynix. Kingston сюда не входит.

one Opteron CPU can handle maximum 6 ranks with PC400.
If you have 3 modules with dual rank (summary 6 ranks), then you can drive with PC400.
If you have 4 modules with dual rank (summary 8 ranks), then you need to speed down to PC333.
If you have 4 modules with single rank (summary 4 ranks), then you can drive with PC400.

Да, не все так просто в этой жизни.

Поправка к моей писаннине:

И еще. В мануале есть следующее:

This motherboard does not support memory modules made up of 128 Mb chips or double sided x16 memory modules.

С чем-то подобным я столкнулся еще на чипсете BX.

BX мог видеть 1 Гиг. Это его адресное пространство поделено на 8 строк (rows) или банков:

— 8 to 512 Mbytes or 1GB (with registered DIMMs)
— Supports up to 4 double-sided DIMMs (8 rows memory)

То есть, в каждом банке могло быть не более 1 Гиг / 8 = 128 Мег. Если попадался модуль поновее с 256 Мегами в банке, виделась только половина.

Источник

Thread: m.2 in Dimm.2 problem

Thread Tools
Search Thread
Display

New ROGer Array f0r3s7 PC Specs

f0r3s7 PC Specs
MotherboardMaximus 11 Extreme
Processori9 9900k
Graphics Card #1EVGA 1080Ti
CPU CoolerCustom Water Cooling
Power SupplyAX860i
OSWindows 10 Pro

Join Date Nov 2018 Reputation 10 Posts 3

m.2 in Dimm.2 problem

Hi guys,
As i`m still new to m.2 and this is my first ROG product and i need a bit of help as I cant find answer anywhere and everything that i have watched and read doesn’t help me to solve the problem that i have, so there it is:
I have Maximus 11 Extreme board and for the first time i`m using m.2 drive which is Samsung 860 EVO 1Tb. For some reason cant make the drive to appear in the BIOS. I have installed it on the Dimm.2 slot with the riser card. I have 4 other sata drives which runs fine but for some reason the m.2 making me problems.
I will appreciate any help with it because i don`t know what to do anymore.
I`m using the latest 0602 Bios from ASUS.
Thank you all in advance.

Hi
i am having the same problem, where in bios.
Ta

In Advanced options

You can select to have Dimm 2.1 enabled or to have both Dimm 2.1 and dimm 2.2 enabled. Selecting the first option does cause the Pcie lane for your VGA to run at 8x by the way.

ROG Guru: White Belt Array MorePower PC Specs

MorePower PC Specs
MotherboardAsus Maximus XI Extreme
ProcessorIntel i9 9900K
Memory (part number)G.Skill Trident Z RGB 32GB
Graphics Card #1ASUS Strix 2080 Ti OC
MonitorLG UltraGear 34GK950G
Storage #1Samsung 970 PRO NVMe M.2
Storage #2Samsung 860 PRO SSD x 2
CPU CoolerASUS ROG Ryuo 240
CasePhanteks Evolv X
Power SupplySeasonic Prime Ultra Titanium 850W
KeyboardCorsair K70 RGB MK.2 Low Profile
MouseCorsair M65 RGB ELITE
Headset/SpeakersKanto YU4 + Sub8
OSWindows 10 Pro

Join Date Oct 2012 Reputation 10 Posts 77

CPU PCIE COnfiguration Mode.

In Advanced options

You can select to have Dimm 2.1 enabled or to have both Dimm 2.1 and dimm 2.2 enabled. Selecting the first option does cause the Pcie lane for your VGA to run at 8x by the way.

Where does it say selecting Dimm 2.1 will set the PCIE to run at 8X?

So there is no way to run the Dimm.2 riser card with a single M.2 and have the PCIE at 16x?

Where does it say selecting Dimm 2.1 will set the PCIE to run at 8X?

So there is no way to run the Dimm.2 riser card with a single M.2 and have the PCIE at 16x?

I know this is a while back but hope this can help others:
Yes you can still run PCIE at 16x, your first slot or the third. This applies only to the 4th X16 slot PCIX8_4 on the R6E, check your motherboard documentation for others.

In the case of the Rampage VI Extreme, the PCIE slot number 4 lanes are shared with the DIMM.2 (& U.2 slot btw). Your options are:
— PCIE #4 slot running at 8X and DIMM.2 #2 (M.2_2) disabled
— PCIE #4 slot running at 4X and DIMM.2 #2 (M.2_2) enable (available)

NOTE: For this to all work, your processor needs to be a 44-Lanes processor, that’s a 7900X and above or 9800 or above for the 9-series.

Источник

Warning your dimm1 and dimm2 moduleorganization is not same please check it что делать

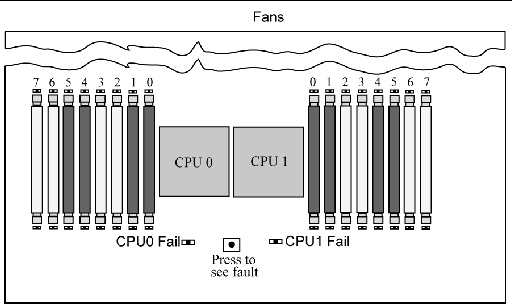
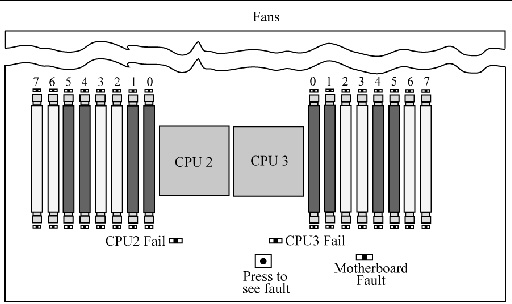
This chapter describes how to detect and correct problems with the server’s Dual Inline Memory Modules (DIMM)s. It includes the following sections:

The DIMM population rules for the server are as follows:

Replace a DIMM when one of the following events takes place:

In addition, a DIMM should be replaced whenever more than 24 Correctable Errors (CEs) originate in 24 hours from a single DIMM and no other DIMM is showing further CEs.

Retain copies of the logs showing the memory errors per the above rules to send to Sun for verification prior to calling Sun.

This section describes system behavior for the two types of DIMM errors: UCEs and CEs, and also describes BIOS DIMM error messages.

Uncorrectable DIMM Errors

For all operating systems (OS’s), the behavior is the same for UCEs:

1. When an UCE occurs, the memory controller causes an immediate reboot of the system.

2. During reboot, the BIOS checks the Machine Check registers and determines that the previous reboot was due to an UCE, then reports this in POST after the memtest stage:

3. BIOS reports this event in the service processor’s system event log (SEL) as shown in the sample IPMItool output below:

The lines in the display start with event numbers (in hex), followed by a description of the event. TABLE 3-1 describes the contents of the display:

TABLE 3-1 Lines in IPMI Output

UCE caused a Hypertransport sync flood which lead to system’s warm reset. #0x02 refers to a reboot count maintained since the last AC power reset.

BIOS detected and initiated 4 processors in system.

BIOS detected a Sync Flood caused this reboot.

BIOS detected a hardware error caused the Sync Flood.

BIOS retrieved and reported some hardware evidence, including all processors’ Machine Check Error registers (events 14 to 18).

After BIOS detected that a UCE had occurred, it located the DIMM and reset. 0x03 refers to reboot count.

BIOS off-lined faulty DIMMs from system memory space and reported them. Each DIMM of a pair is being reported, since hardware UCE evidence cannot lead BIOS any further than detection of a faulty pair.

Correctable DIMM Errors

If a DIMM has 24 or more correctable errors in 24 hours, it is considered defective and should be replaced.

At this time, CEs are not logged in the server’s system event logs. They are reported or handled in the supported OS’s as follows:

a. A Machine Check error-message bubble appears on the task bar.

b. The user must manually open Event Viewer to view errors. Access Event Viewer through this menu path:

c. The user can then view individual errors (by time) to see details of the error.

Solaris FMA reports and (sometimes) retires memory with correctable Error Correction Code (ECC) errors. See your Solaris Operating System documentation for details. Use the command:

to view ECC errors

The HERD utility can be used to manage DIMM errors in Linux. See the x64 Servers Utilities Reference Manual for details.

The Bootable Diagnostics CD described in Chapter 2 also captures and logs CEs.

BIOS DIMM Error Messages

The BIOS displays and logs the following DIMM error messages:

The following conditions will cause this error message:

DIMM Fault LEDs

When you press the Press to See Fault button on the motherboard or the mezzanine board, LEDs next to the DIMMs flash to indicate that the system has detected 24 or more CEs in a 24-hour period on that DIMM.

See FIGURE 3-1 for the locations of DIMMs and LEDs on the motherboard. See FIGURE 3-2 for the locations of DIMMs and LEDs on the mezzanine board.

FIGURE 3-1 DIMMs and LEDs on Motherboard

warning your dimm1 and dimm2 moduleorganization is not same please check it что делать. Смотреть фото warning your dimm1 and dimm2 moduleorganization is not same please check it что делать. Смотреть картинку warning your dimm1 and dimm2 moduleorganization is not same please check it что делать. Картинка про warning your dimm1 and dimm2 moduleorganization is not same please check it что делать. Фото warning your dimm1 and dimm2 moduleorganization is not same please check it что делать

FIGURE 3-2 DIMMs and LEDs on Mezzanine Board

warning your dimm1 and dimm2 moduleorganization is not same please check it что делать. Смотреть фото warning your dimm1 and dimm2 moduleorganization is not same please check it что делать. Смотреть картинку warning your dimm1 and dimm2 moduleorganization is not same please check it что делать. Картинка про warning your dimm1 and dimm2 moduleorganization is not same please check it что делать. Фото warning your dimm1 and dimm2 moduleorganization is not same please check it что делать

If your log files report an ECC error or a problem with a DIMM, complete the steps below until you can isolate the fault.

In this example, the log file reports an error with the DIMM in CPU0, slot 7. The fault LEDs on CPU0, slots 6 and 7 are on.

To isolate and correct DIMM ECC errors:

1. If you have not already done so, shut down your server to standby power mode and remove the cover.

2. Inspect the installed DIMMs to ensure that they comply with the DIMM Population Rules.

3. Press the PRESS TO SEE FAULT button, and inspect the DIMM fault LEDs. See FIGURE 3-1 and FIGURE 3-2.

A flashing LED identifies a component with a fault.

4. Disconnect the AC power cords from the server.

5. Remove the DIMMs from the DIMM slots in the CPU.

Refer to your server’s service manual for details.

6. Visually inspect the DIMMs for physical damage, dust, or any other contamination on the connector or circuits.

7. Visually inspect the DIMM slot for physical damage. Look for cracked or broken plastic on the slot.

8. Dust off the DIMMs, clean the contacts, and reseat them.

9. If there is no obvious damage, replace any failed DIMMs.

For UCEs, if the LEDs indicate a fault with the pair, replace both DIMMs. Ensure that they are inserted correctly with ejector latches secured.

10. Reconnect AC power cords to the server.

11. Power on the server and run the diagnostics test again.

12. Review the log file.

If the tests identify the same error, the problem is in the CPU, not the DIMMs.

Sun Fire X4140, X4240, and X4440 Servers Diagnostics Guide820-3067-14warning your dimm1 and dimm2 moduleorganization is not same please check it что делать. Смотреть фото warning your dimm1 and dimm2 moduleorganization is not same please check it что делать. Смотреть картинку warning your dimm1 and dimm2 moduleorganization is not same please check it что делать. Картинка про warning your dimm1 and dimm2 moduleorganization is not same please check it что делать. Фото warning your dimm1 and dimm2 moduleorganization is not same please check it что делатьwarning your dimm1 and dimm2 moduleorganization is not same please check it что делать. Смотреть фото warning your dimm1 and dimm2 moduleorganization is not same please check it что делать. Смотреть картинку warning your dimm1 and dimm2 moduleorganization is not same please check it что делать. Картинка про warning your dimm1 and dimm2 moduleorganization is not same please check it что делать. Фото warning your dimm1 and dimm2 moduleorganization is not same please check it что делатьwarning your dimm1 and dimm2 moduleorganization is not same please check it что делать. Смотреть фото warning your dimm1 and dimm2 moduleorganization is not same please check it что делать. Смотреть картинку warning your dimm1 and dimm2 moduleorganization is not same please check it что делать. Картинка про warning your dimm1 and dimm2 moduleorganization is not same please check it что делать. Фото warning your dimm1 and dimm2 moduleorganization is not same please check it что делатьwarning your dimm1 and dimm2 moduleorganization is not same please check it что делать. Смотреть фото warning your dimm1 and dimm2 moduleorganization is not same please check it что делать. Смотреть картинку warning your dimm1 and dimm2 moduleorganization is not same please check it что делать. Картинка про warning your dimm1 and dimm2 moduleorganization is not same please check it что делать. Фото warning your dimm1 and dimm2 moduleorganization is not same please check it что делать

Copyright © 2010, Oracle and/or its affiliates. All rights reserved.

Источник

Добавить комментарий

Ваш адрес email не будет опубликован. Обязательные поля помечены *